> For the complete documentation index, see [llms.txt](https://docs.forestall.io/fsprotect/llms.txt). Markdown versions of documentation pages are available by appending `.md` to page URLs; this page is available as [Markdown](https://docs.forestall.io/fsprotect/configuration-center/sso/azure-configuration.md).

# Azure Configuration

Forestall ISPM can be integrated with the Azure SSO to simplify authentication. The following configurations must be completed for integration:

### 1. Create an Enterprise Application

* Go to [**https://portal.azure.com**](https://portal.azure.com/) and log in.

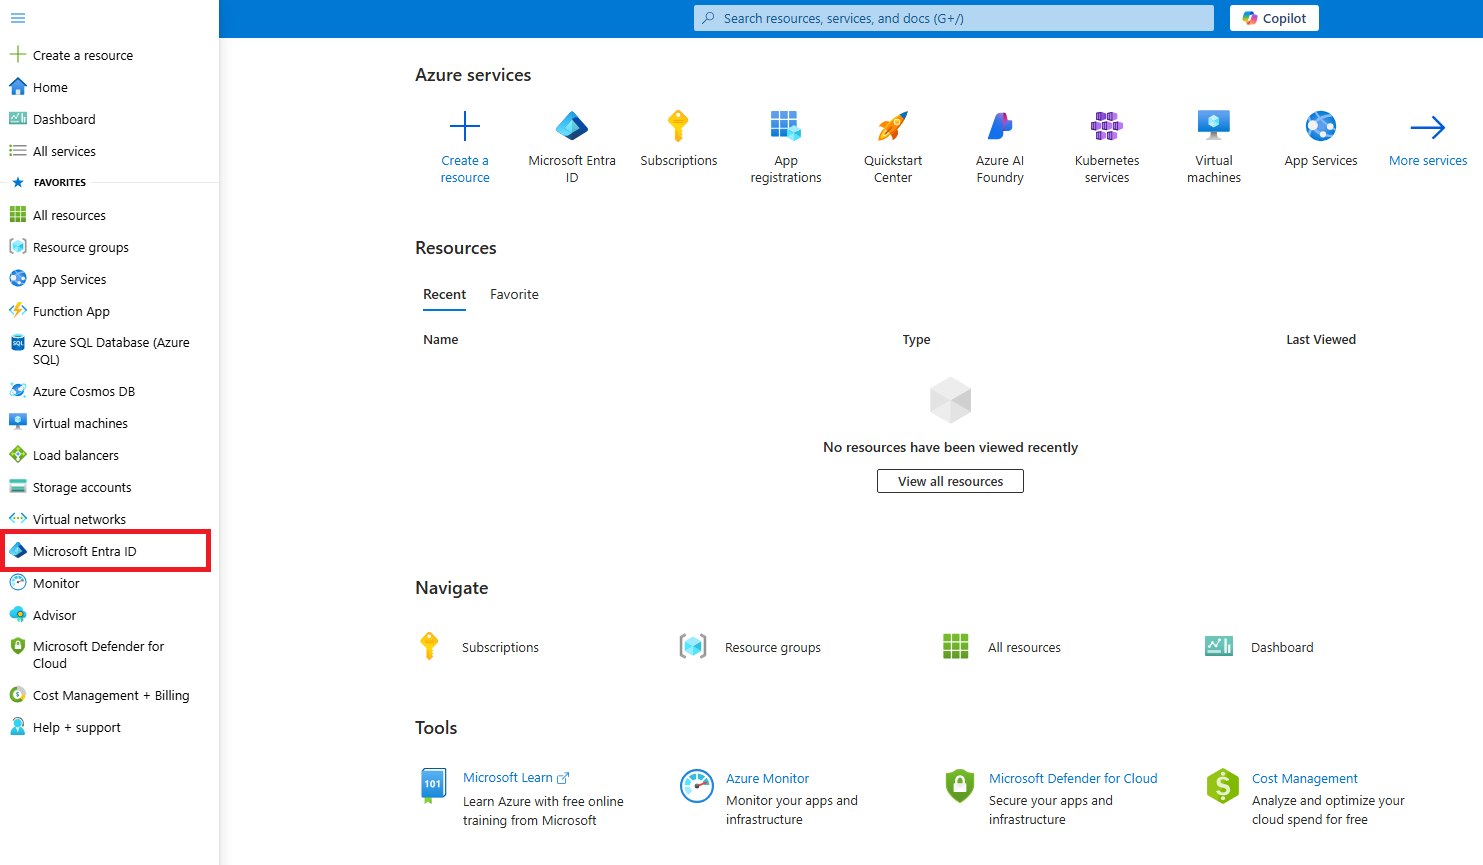
<figure><img src="https://3408039743-files.gitbook.io/~/files/v0/b/gitbook-x-prod.appspot.com/o/spaces%2FObpV44hoVkNmo5bFuVVL%2Fuploads%2Fgit-blob-243648a71475c9697f4355ad7ec886e61f83d679%2Fhome-page.png?alt=media" alt=""><figcaption><p>In Menu Select Microsoft Entra ID</p></figcaption></figure>

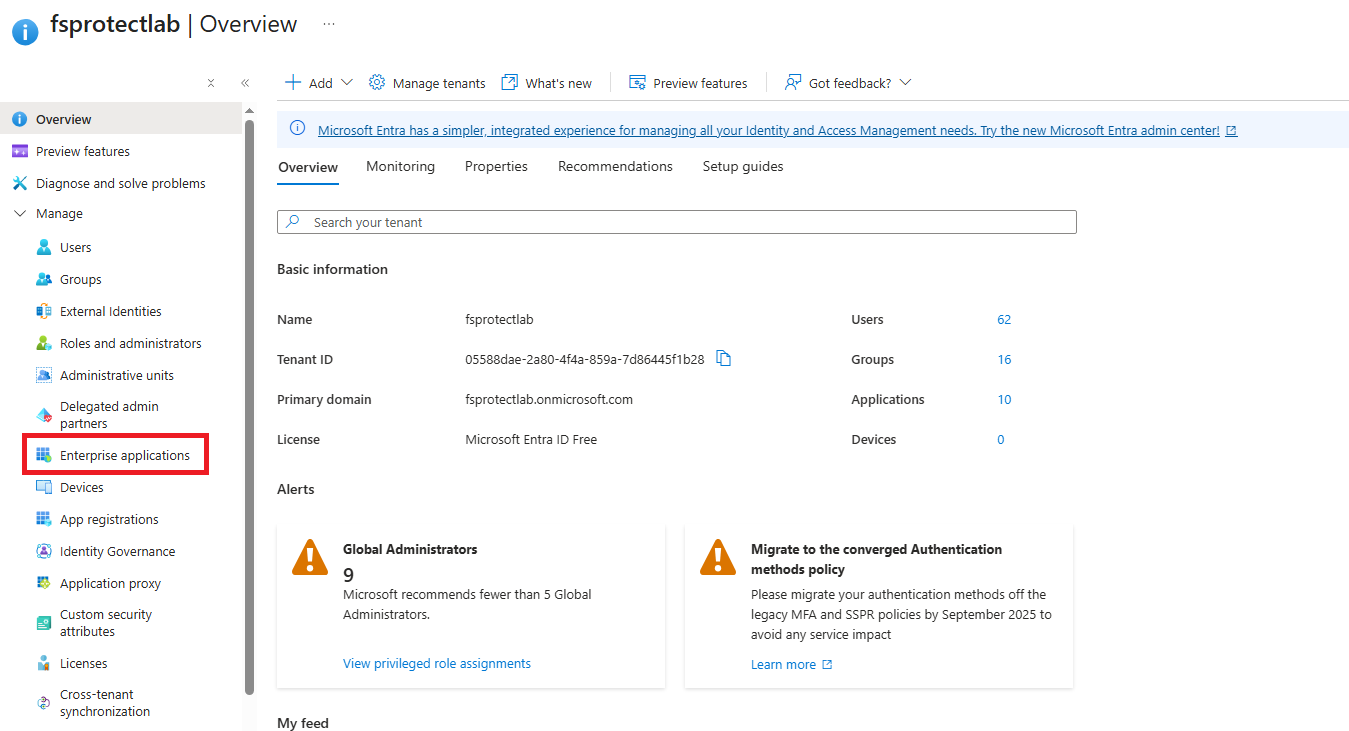
* Navigate to **Microsoft Entra ID** > **Enterprise applications**.

<figure><img src="https://3408039743-files.gitbook.io/~/files/v0/b/gitbook-x-prod.appspot.com/o/spaces%2FObpV44hoVkNmo5bFuVVL%2Fuploads%2Fgit-blob-d3e9fc6d35bfd695ce91d8b73a017e0da7c89b2b%2Fenterprise-applications.png?alt=media" alt=""><figcaption><p>In Menu Select Enterprise Applications</p></figcaption></figure>

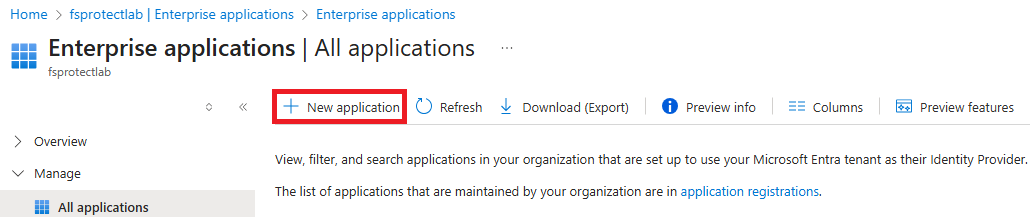
* Click on **"New application"**.

<figure><img src="https://3408039743-files.gitbook.io/~/files/v0/b/gitbook-x-prod.appspot.com/o/spaces%2FObpV44hoVkNmo5bFuVVL%2Fuploads%2Fgit-blob-71bcf17f463c9ac751697367f3c23c4619814b94%2Fnew-application.png?alt=media" alt=""><figcaption><p>Click "New Application"</p></figcaption></figure>

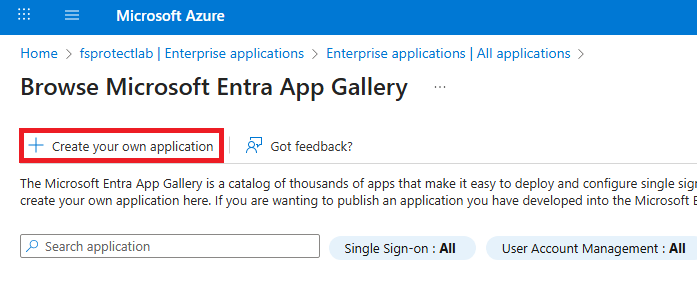
* Select **"Create your own application"**.

<figure><img src="https://3408039743-files.gitbook.io/~/files/v0/b/gitbook-x-prod.appspot.com/o/spaces%2FObpV44hoVkNmo5bFuVVL%2Fuploads%2Fgit-blob-3464ebe8677dcd553755e4d7e2d0ee08a8599261%2Fcreate-your-own-application.png?alt=media" alt=""><figcaption><p>Click "Create your own application" button</p></figcaption></figure>

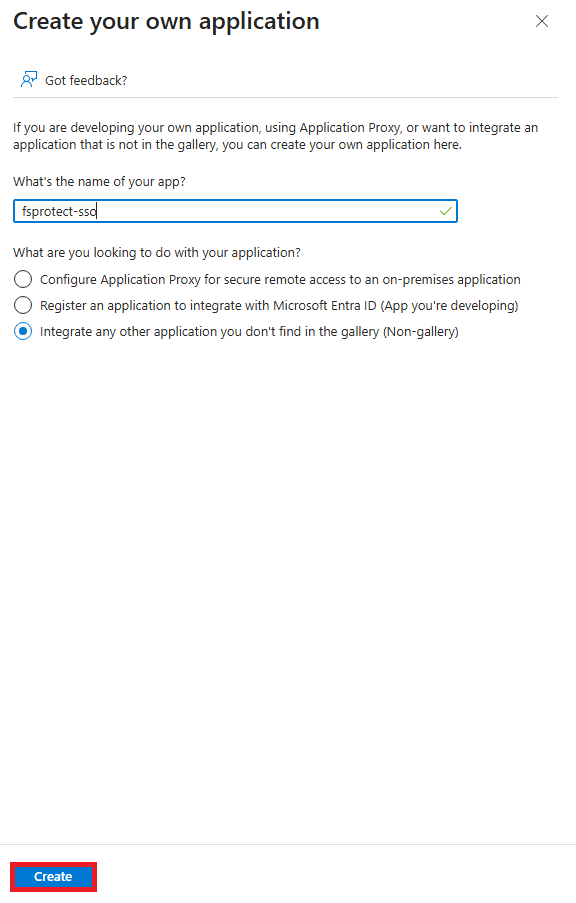
* Provide a **name** for your app (e.g., `forestall-SSO`).
* Choose the option: **"Integrate any other application you don’t find in the gallery (Non-gallery)"**
* Click **Create**.

<figure><img src="https://3408039743-files.gitbook.io/~/files/v0/b/gitbook-x-prod.appspot.com/o/spaces%2FObpV44hoVkNmo5bFuVVL%2Fuploads%2Fgit-blob-c69b481de1ee24121fa66c11c084d91038de53f1%2Fcreate-your-own-application-2.png?alt=media" alt=""><figcaption><p>Create your new application menu</p></figcaption></figure>

{% hint style="info" %}
At this point, your custom application will be created and added under Enterprise Applications.
{% endhint %}

### 2. Set Up Single Sign-On (SAML)

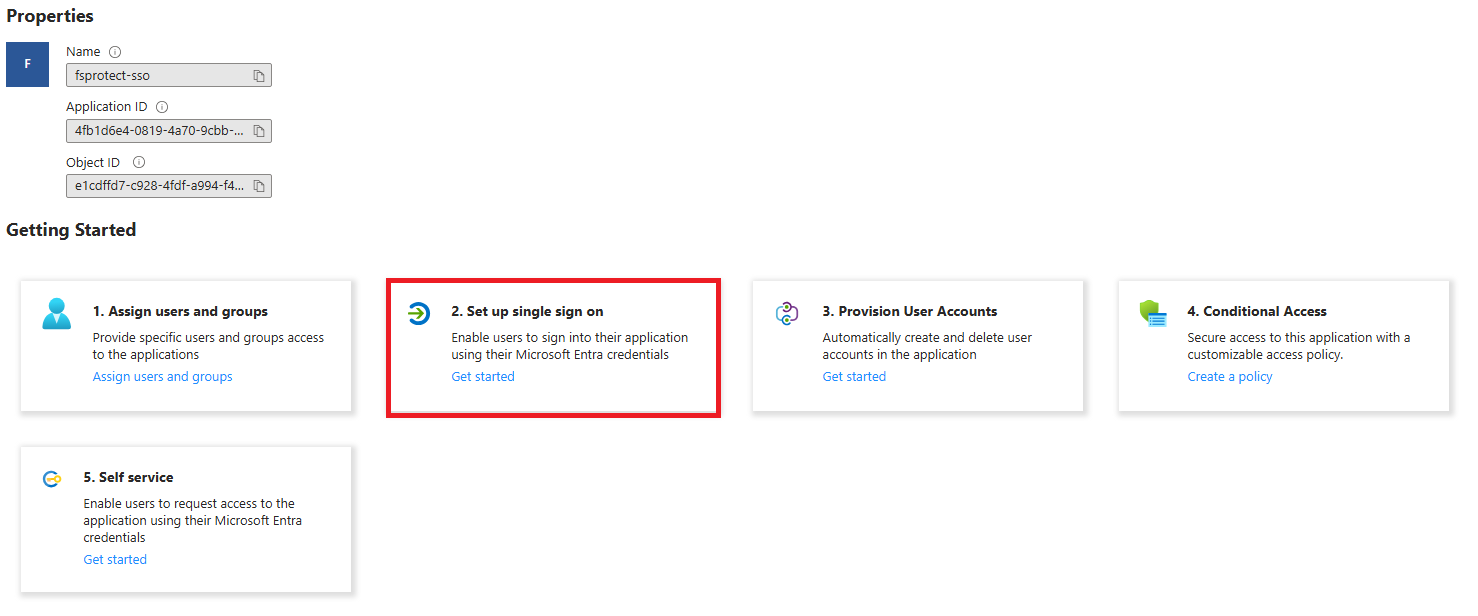
* In the left menu of the application page, select **Single sign-on** or select **Set up single sign-on** after creating app.

<figure><img src="https://3408039743-files.gitbook.io/~/files/v0/b/gitbook-x-prod.appspot.com/o/spaces%2FObpV44hoVkNmo5bFuVVL%2Fuploads%2Fgit-blob-e71c2e2783a55ad8e4d059951c7e7f300f3b2dfd%2Fset-up-single-sign-on.png?alt=media" alt=""><figcaption><p>Set up single sign on</p></figcaption></figure>

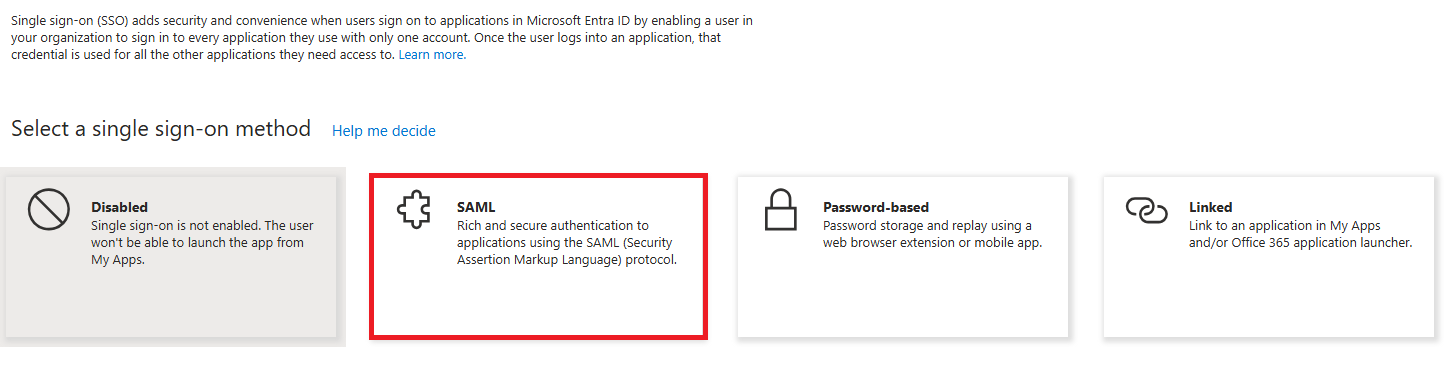
* Choose **SAML** as the single sign-on method.

<figure><img src="https://3408039743-files.gitbook.io/~/files/v0/b/gitbook-x-prod.appspot.com/o/spaces%2FObpV44hoVkNmo5bFuVVL%2Fuploads%2Fgit-blob-1a516410cc38d5afd403cb67a01ccd5a0b1dd852%2Fselect-a-single-sign-on-method.png?alt=media" alt=""><figcaption><p>Select "SAML" from menu</p></figcaption></figure>

* You will now see multiple sections, including:
  * Basic SAML Configuration
  * Attributes & Claims
  * SAML Signing Certificate
  * Set up \[App Name]

### 3. Configure Attributes & Claims

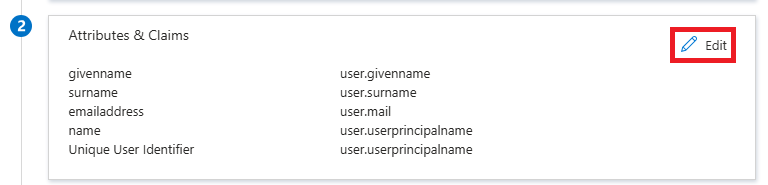
* In the **Attributes & Claims** section, click **Edit**.

<figure><img src="https://3408039743-files.gitbook.io/~/files/v0/b/gitbook-x-prod.appspot.com/o/spaces%2FObpV44hoVkNmo5bFuVVL%2Fuploads%2Fgit-blob-eb1734ee684909395cc32aae8c1e47225ce78595%2Fattributes-claims.png?alt=media" alt=""><figcaption><p>Click "Edit" Button</p></figcaption></figure>

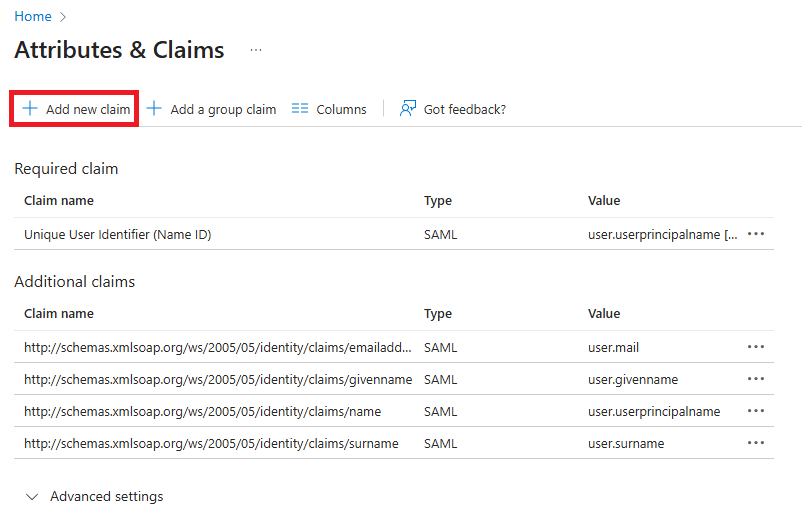
* Review the default claims (such as `email`, `givenname`, `surname`, etc.).
* To add a custom claim:
  * Click **Add new claim**
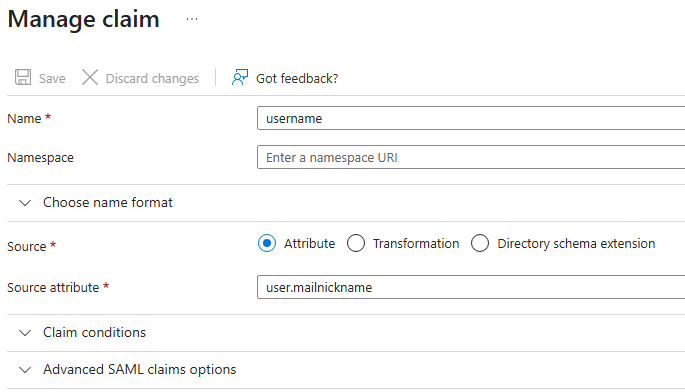
  * Enter a **Name** (e.g., `username`)
  * Choose the appropriate **Source** (e.g., user attribute or transformation)
  * For user attributes, select from available directory attributes like `user.mailnickname` etc.
  * Click **Save**

<figure><img src="https://3408039743-files.gitbook.io/~/files/v0/b/gitbook-x-prod.appspot.com/o/spaces%2FObpV44hoVkNmo5bFuVVL%2Fuploads%2Fgit-blob-a118c37b74f829560a18ef4c0dff40cafe600ca1%2Fattributes-claims-2.png?alt=media" alt=""><figcaption><p>Click "Add new claim" button</p></figcaption></figure>

<figure><img src="https://3408039743-files.gitbook.io/~/files/v0/b/gitbook-x-prod.appspot.com/o/spaces%2FObpV44hoVkNmo5bFuVVL%2Fuploads%2Fgit-blob-7133d5c20db7ff8c3faaae5bba5f56b4e3c97b93%2Fmanage-claim-username.png?alt=media" alt=""><figcaption><p>Fill claim informations for username</p></figcaption></figure>

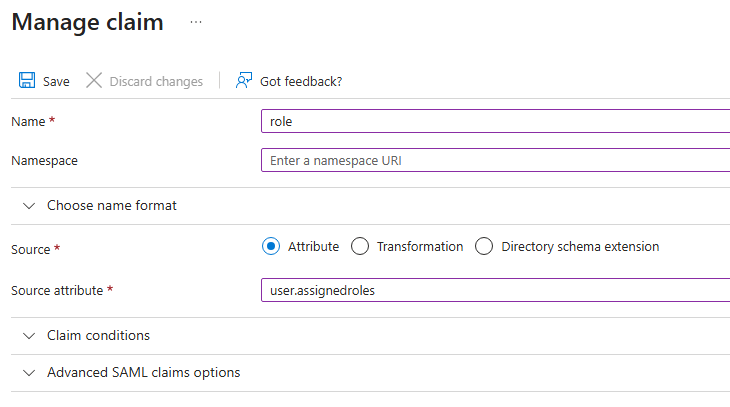
* Do the same things for the `role`:
  * Enter a **Name** (e.g., `username`)
  * Choose the appropriate **Source** (e.g., user attribute or transformation)
  * For user attributes, select from available directory attributes like `user.assignedroles` etc.

<figure><img src="https://3408039743-files.gitbook.io/~/files/v0/b/gitbook-x-prod.appspot.com/o/spaces%2FObpV44hoVkNmo5bFuVVL%2Fuploads%2Fgit-blob-9b176cf0bbabe642d0e20eecb99fb2bf2f990624%2Fmanage-claim-role.png?alt=media" alt=""><figcaption><p>Fill claim informations for username for role</p></figcaption></figure>

### 4. Configure Basic SAML Settings

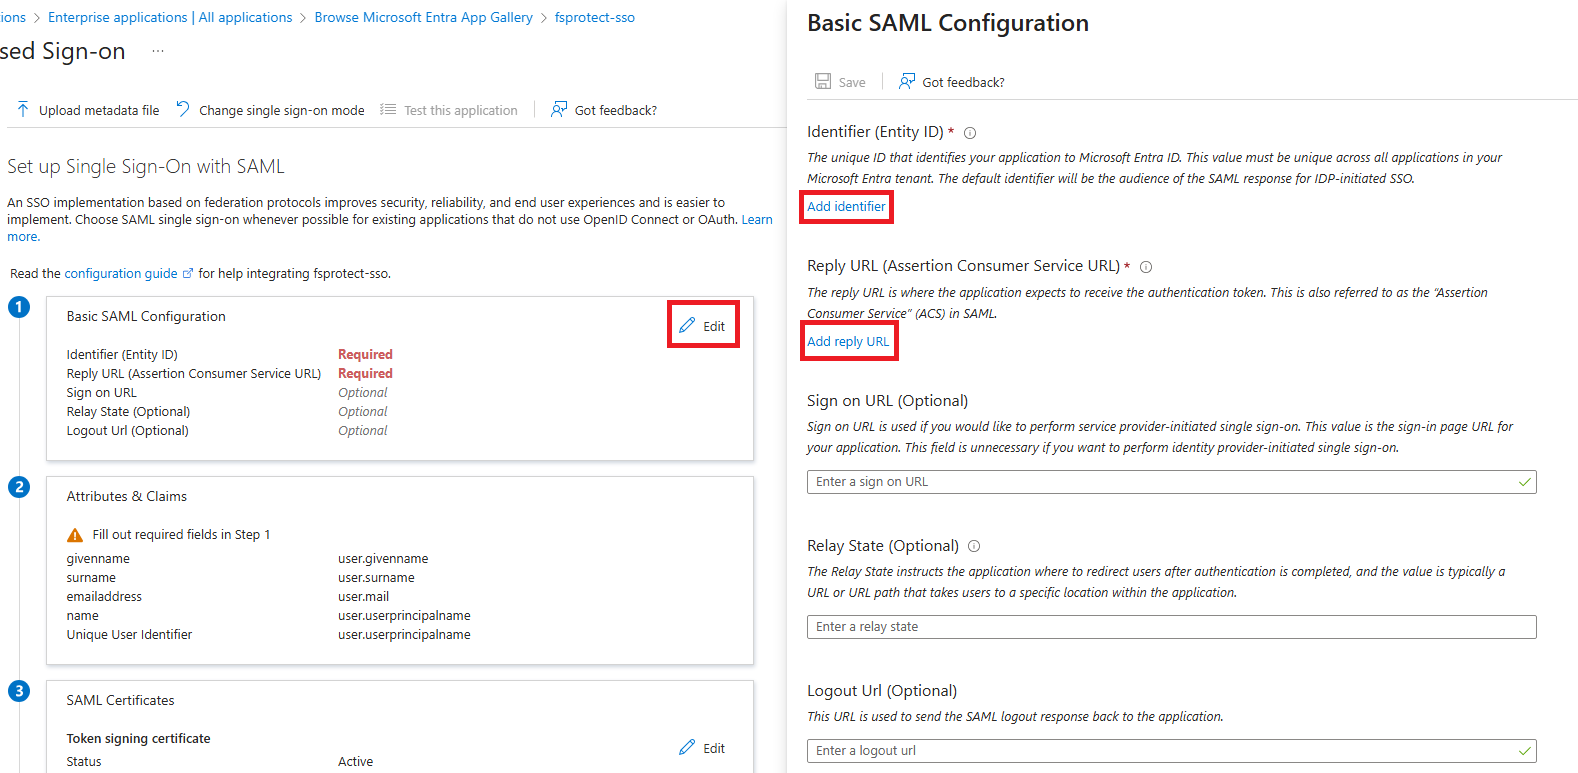
* Click **Edit** in the **Basic SAML Configuration** section.

<figure><img src="https://3408039743-files.gitbook.io/~/files/v0/b/gitbook-x-prod.appspot.com/o/spaces%2FObpV44hoVkNmo5bFuVVL%2Fuploads%2Fgit-blob-6f2d722a0d4c582b69866a0bc258e503edc112f9%2Fbasic-saml-configuration.png?alt=media" alt=""><figcaption><p>Basic SAML Configuration</p></figcaption></figure>

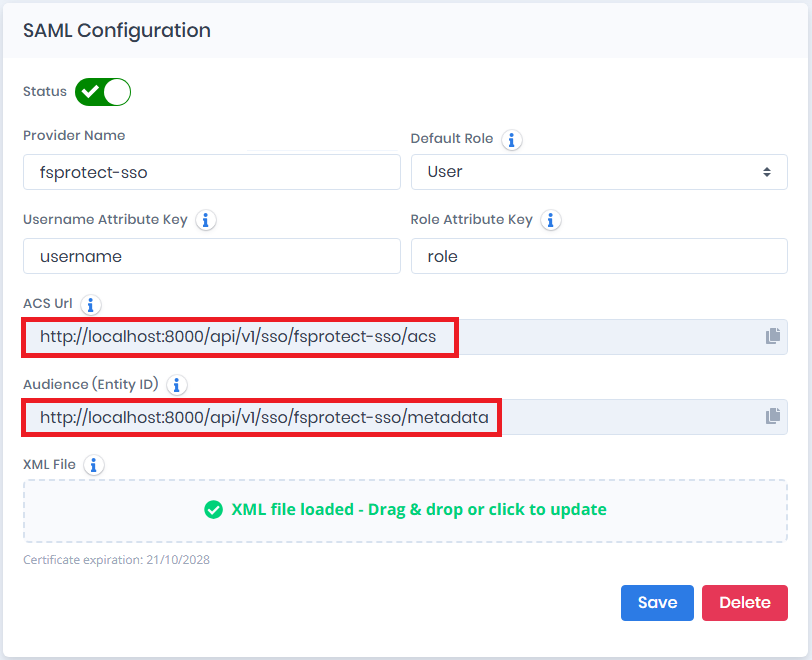
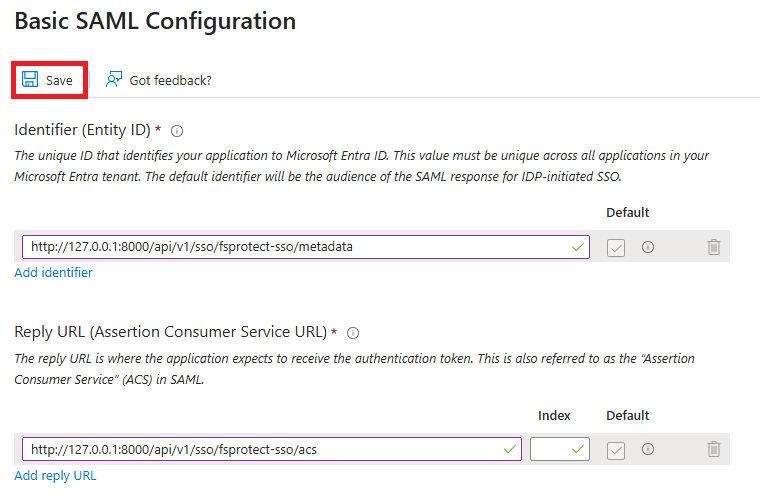
* Fill in the required fields on the Basic SAML Configuration based on the `Settings` > `SSO` > `SSO Details` in Forestall.

<figure><img src="https://3408039743-files.gitbook.io/~/files/v0/b/gitbook-x-prod.appspot.com/o/spaces%2FObpV44hoVkNmo5bFuVVL%2Fuploads%2Fgit-blob-658b77f5a12dfc6cb865327d1f9cc1f2886f48b9%2Facs-url.png?alt=media" alt=""><figcaption><p>ACS Url and Audience (Entity ID) from SSO page</p></figcaption></figure>

<figure><img src="https://3408039743-files.gitbook.io/~/files/v0/b/gitbook-x-prod.appspot.com/o/spaces%2FObpV44hoVkNmo5bFuVVL%2Fuploads%2Fgit-blob-248080a8afb24114f3f3acdc1f32f3f7bfce46f9%2Fbasic-saml-configuration-save.png?alt=media" alt=""><figcaption><p>Basic SAML Configuration sidebar</p></figcaption></figure>

| Field                      | Description                                            | Example                                                  |
| -------------------------- | ------------------------------------------------------ | -------------------------------------------------------- |
| **Identifier (Entity ID)** | Unique URI identifying your SP                         | `http://{baseURL}/api/v1/sso/{ssoProviderName}/metadata` |
| **Reply URL (ACS URL)**    | Endpoint where SAML assertions are sent (POST binding) | `http://{baseURL}/api/v1/sso/{ssoProviderName}/acs`      |

### 5. Download SAML Metadata XML

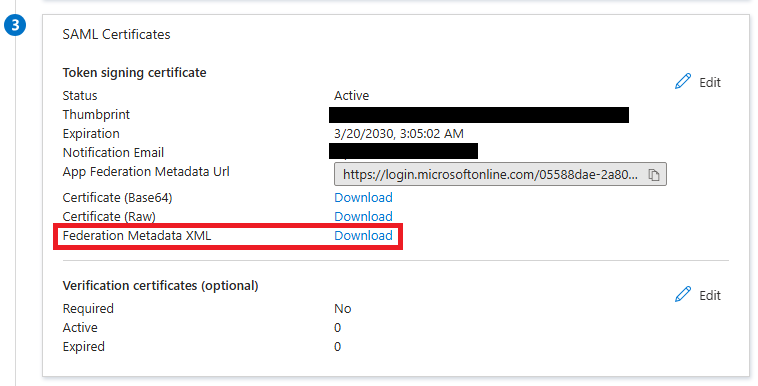
* Scroll to the **SAML Signing Certificate** section.
* Locate the **Federation Metadata XML** link.
* Click **Download**.

<figure><img src="https://3408039743-files.gitbook.io/~/files/v0/b/gitbook-x-prod.appspot.com/o/spaces%2FObpV44hoVkNmo5bFuVVL%2Fuploads%2Fgit-blob-f48e98e26f918dd0ca02c3e803be85dad5770a52%2Fsso-metadata-xml.png?alt=media" alt=""><figcaption><p>SAML Certificates</p></figcaption></figure>

{% hint style="info" %}
Save this XML file securely. It will be used to configure the SSO of your SAML integration.
{% endhint %}