> For the complete documentation index, see [llms.txt](https://docs.forestall.io/fsprotect/llms.txt). Markdown versions of documentation pages are available by appending `.md` to page URLs; this page is available as [Markdown](https://docs.forestall.io/fsprotect/configuration-center/jira.md).
# Jira
The JIRA integration provides users with the organizational convenience of managing vulnerabilities detected in Forestall ISPM. When you configure the plugin, Forestall uses these fields to organize and manage vulnerabilities detected when running vulnerability scans.
When the following configuration steps have been successfully done, users can assign the found `Issues` from Forestall as JIRA tickets to their team members.
The JIRA integration consists of two configuration requirements ;
* **REST API Connection Information**
* **Data binding fields between JIRA and Forestall**
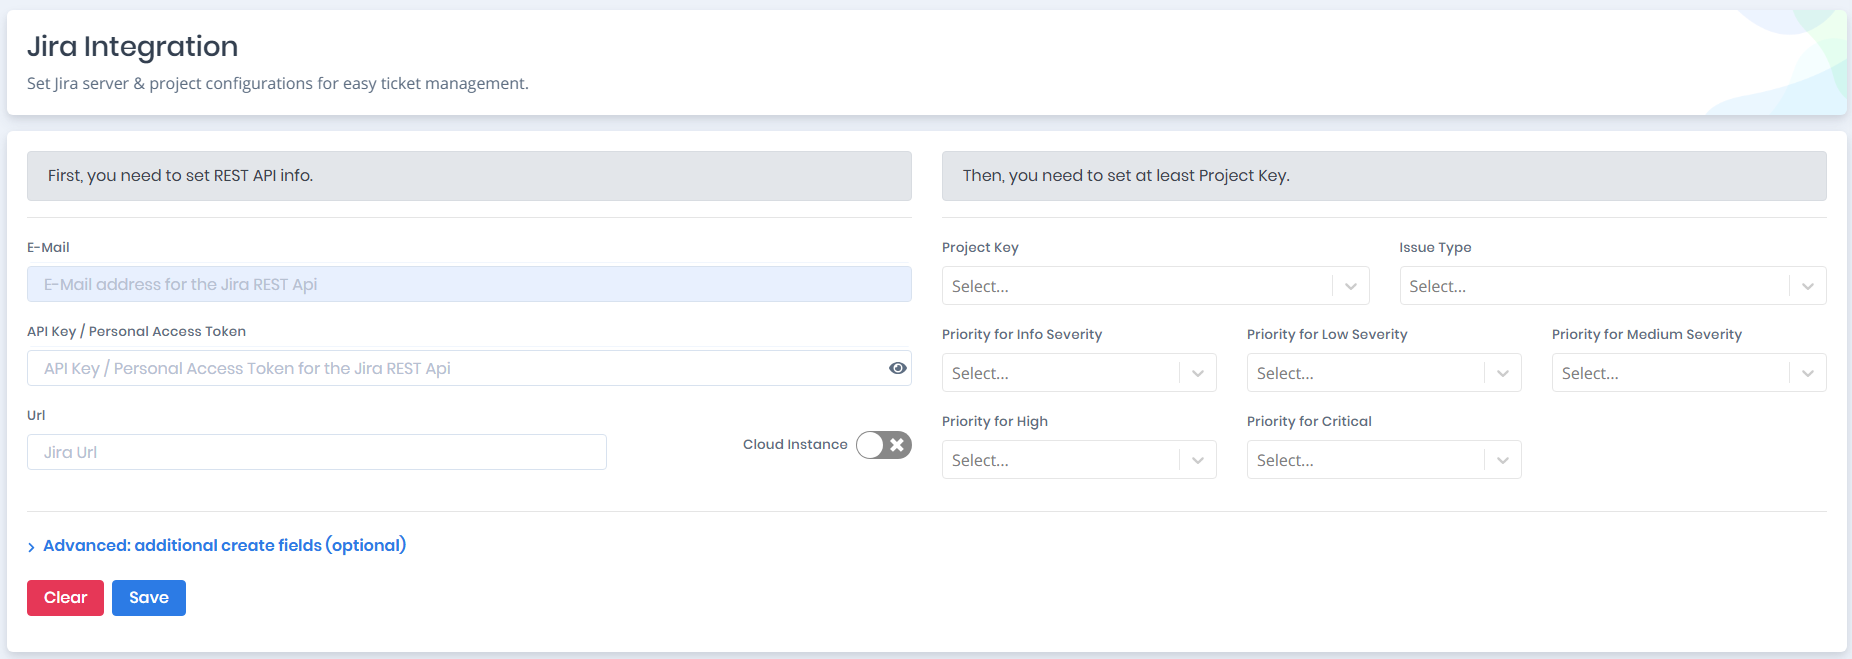
Jira Integration
## **Configuring the REST API Connection**
Before the configuration of the project specifications, the REST API connection information must be supplied.
Forestall supports both on-prem and cloud JIRA instances.
Following input fields must be supplied according to the JIRA instance,

**E-Mail**: The e-mail address of the JIRA API user.
**API Key/Personal Access Token**:
* The generated API Key for cloud JIRA instances to authenticate over REST API. ()
* The generate Personal Acccess Token for on-premise JIRA instances to authenticate over REST API.()
**URL**: The url address of the JIRA server.
**Cloud Instance**: JIRA instance type.Switch on for cloud instances, switch off for on-premise instances.
Submitting the form with the `Save` button validates the user supplied input.
If the connection information is correct, the project specification tab has been enabled.

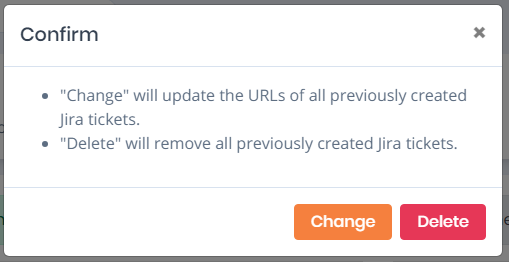
## Updating the Jira Address
* "Change" will update the URLs of all previously created Jira tickets.
* "Delete" will remove all previously created Jira tickets.
## **Data Binding between JIRA and Forestall**
The JIRA specification tab allows users to specify the project details and relevant data binding configurations between Forestall and JIRA.

**Project Key**: Name of the project that is created from JIRA for the found `Issues` by Forestall.
**Issue Type**: The type of issues to bind the created tickets in a specified category.
**Priority for Info Severity**: The severity mapping for the Information level `Issues` found by Forestall to the JIRA level specification.
**Priority for Low Severity**: The severity mapping for the Low level `Issues` found by Forestall to the JIRA level specification.
**Priority for Medium Severity**: The severity mapping for the Medium level `Issues` found by Forestall to the JIRA level specification.
**Priority for High Severity**: The severity mapping for the High level `Issues` found by Forestall to the JIRA level specification.
**Priority for Critical Severity**: The severity mapping for the Critical level `Issues` found by Forestall to the JIRA level specification.
Submitting the form with the `Save` saves the binding and mapping configurations between Forestall and JIRA.
## Advanced: Additional Create Fields
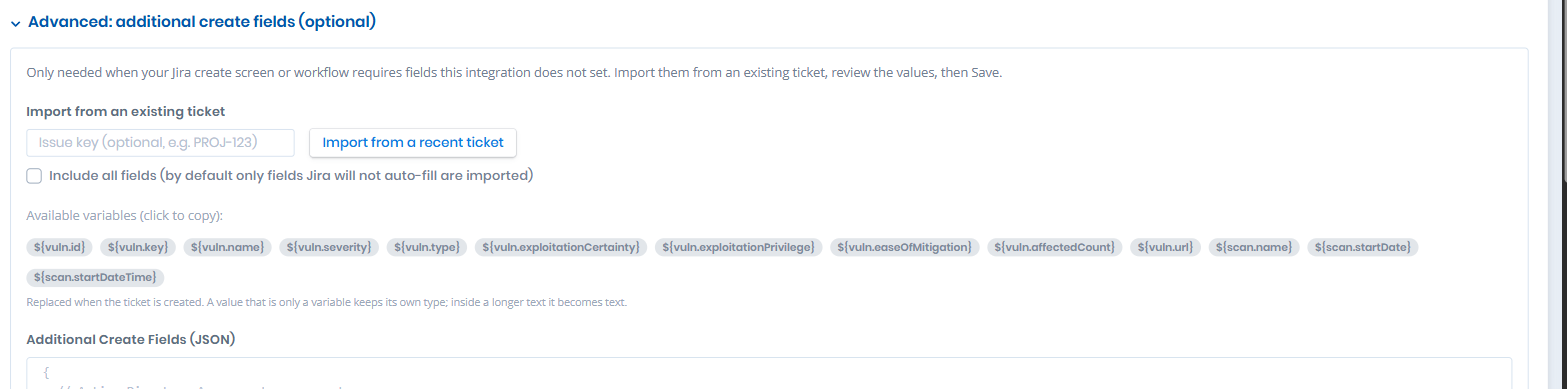
Some Jira projects require fields on their create screen or in their workflow that the integration does not set by itself. The **Advanced: additional create fields (optional)** section of the Jira configuration supplies those fields.
Advanced: additional create fields
**Import from an existing ticket**: Enter an issue key, for example `PROJ-123`, or use **Import from a recent ticket** to read the field values from a ticket that already satisfies the project's requirements. By default only the fields Jira will not auto-fill are imported; select **Include all fields** to import every field.
**Additional Create Fields (JSON)**: The imported values, which are merged verbatim into the Jira create request. Lines beginning with `//` are treated as comments and ignored, so each field can be annotated. Leaving the box empty disables the feature.
### Variables
A field value can contain a variable that is replaced when the ticket is created. Clicking a variable in the **Available variables** list copies it.
| Variable | Value |
| ------------------------------- | ---------------------------------------------- |
| `${vuln.id}` | Identifier of the issue. |
| `${vuln.key}` | Key of the issue. |
| `${vuln.name}` | Name of the issue. |
| `${vuln.severity}` | Severity of the issue. |
| `${vuln.type}` | Type of the issue. |
| `${vuln.exploitationCertainty}` | How likely the issue can be exploited. |
| `${vuln.exploitationPrivilege}` | Privilege level required to exploit the issue. |
| `${vuln.easeOfMitigation}` | How easily the issue can be mitigated. |
| `${vuln.affectedCount}` | Number of objects affected by the issue. |
| `${vuln.url}` | Link to the issue in Forestall. |
| `${scan.name}` | Name of the scan the issue was detected in. |
| `${scan.startDate}` | Start date of the scan. |
| `${scan.startDateTime}` | Start date and time of the scan. |
A value that is only a variable keeps its own type, so a numeric variable stays a number. A variable used inside a longer text becomes text.
{% hint style="warning" %}
The JSON is merged into the create request exactly as written. Review the imported values before saving, because a field Jira rejects will prevent tickets from being created.
{% endhint %}
## **Assign Issues to Users**
After a successful JIRA configuration, route to the `Issues` tab and choose `Create JIRA Ticket` from the three-dot button and supply the necessary information;
* Issue Type
* Issue Priority
* Issue Assignee

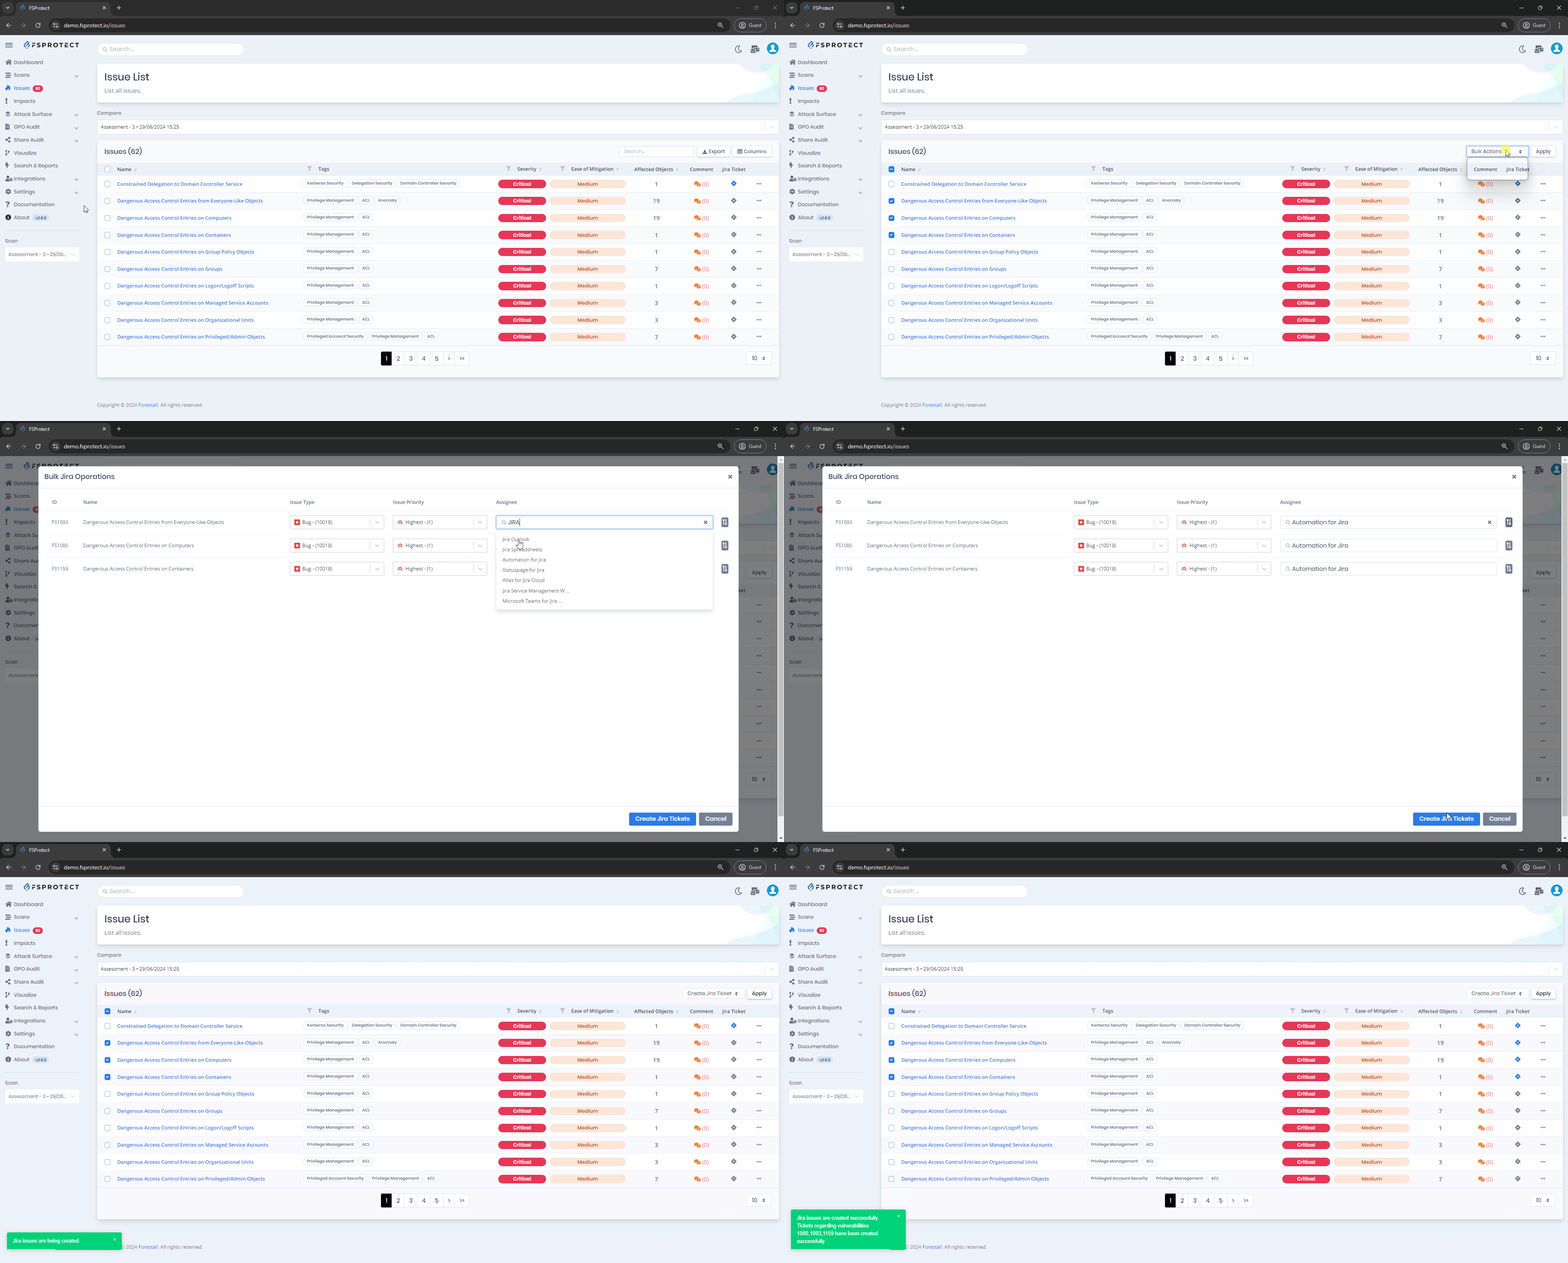
To create tickets for multiple vulnerabilities at once, navigate to the 'Issues' tab and begin selecting vulnerabilities from the checkboxes located in the leftmost section of the table. Upon selecting the desired vulnerabilities, proceed to choose 'Create Jira Ticket' from the bulk action menu, and then click 'Apply'. After clicking the “Apply” button, supply the necessary information. The button located at the rightmost side of the table can be used to assign the assignee of the row to all tickets to be created.
Assigning issues in bulk
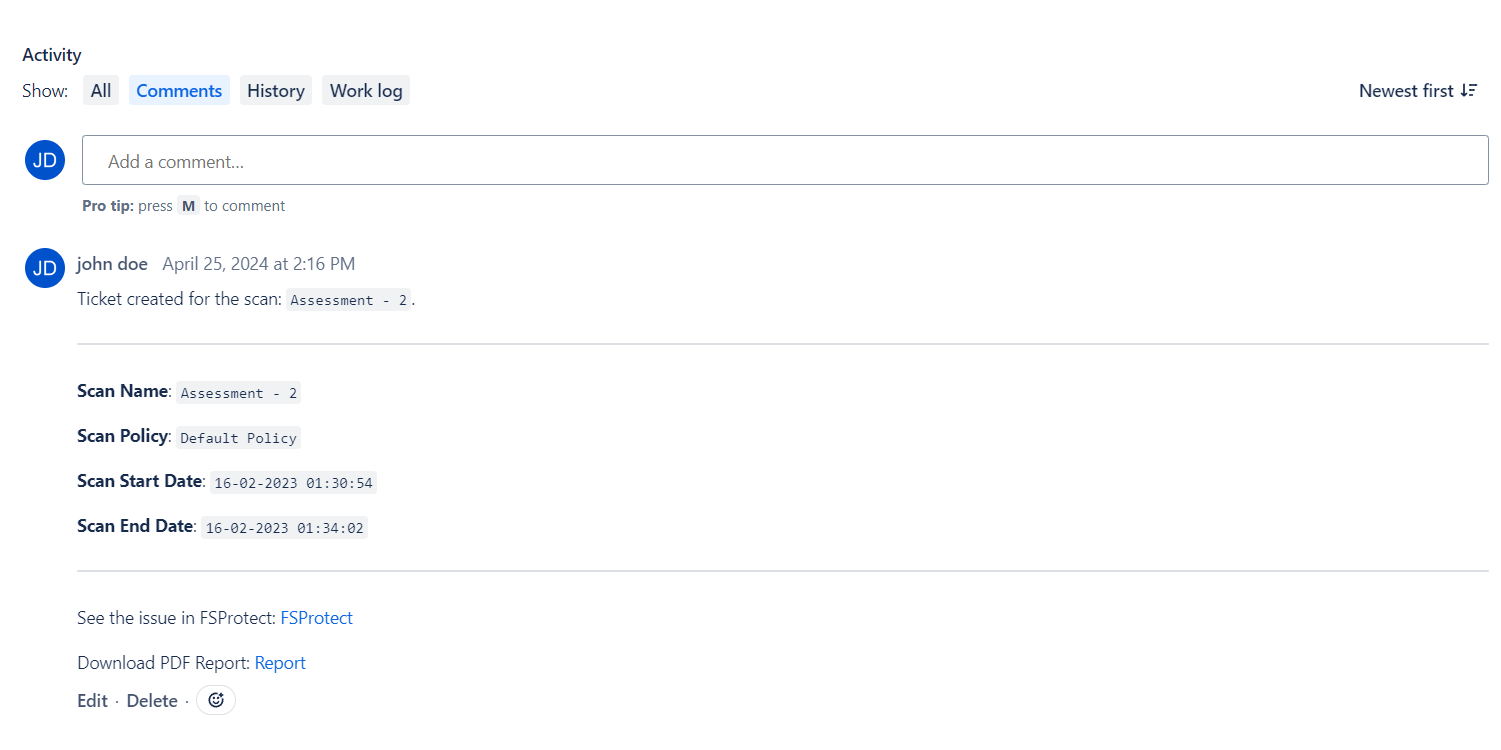
Successfuly created tickets can be analyzed from the JIRA,

Tickets created for the scan will appear in the comment section of the respective ticket in JIRA, accompanied by relevant information and reports.