> For the complete documentation index, see [llms.txt](https://docs.forestall.io/fsprotect/llms.txt). Markdown versions of documentation pages are available by appending `.md` to page URLs; this page is available as [Markdown](https://docs.forestall.io/fsprotect/configuration-center/azure-configurations.md).

# Azure Configurations

## Microsoft Azure Integration – Step-by-Step Requirements

To integrate this project with Microsoft Azure, specific permissions must be granted to the application. This guide outlines how to grant these permissions using the **Azure Portal**, as well as an **optional PowerShell script** alternative.

{% hint style="success" %}
The quickest route is the **Copy PS** button on the Azure Configuration page itself, which generates a script that performs every step below in one run. See [Generated Setup Script](#generated-setup-script).
{% endhint %}

## The Azure Configuration Page

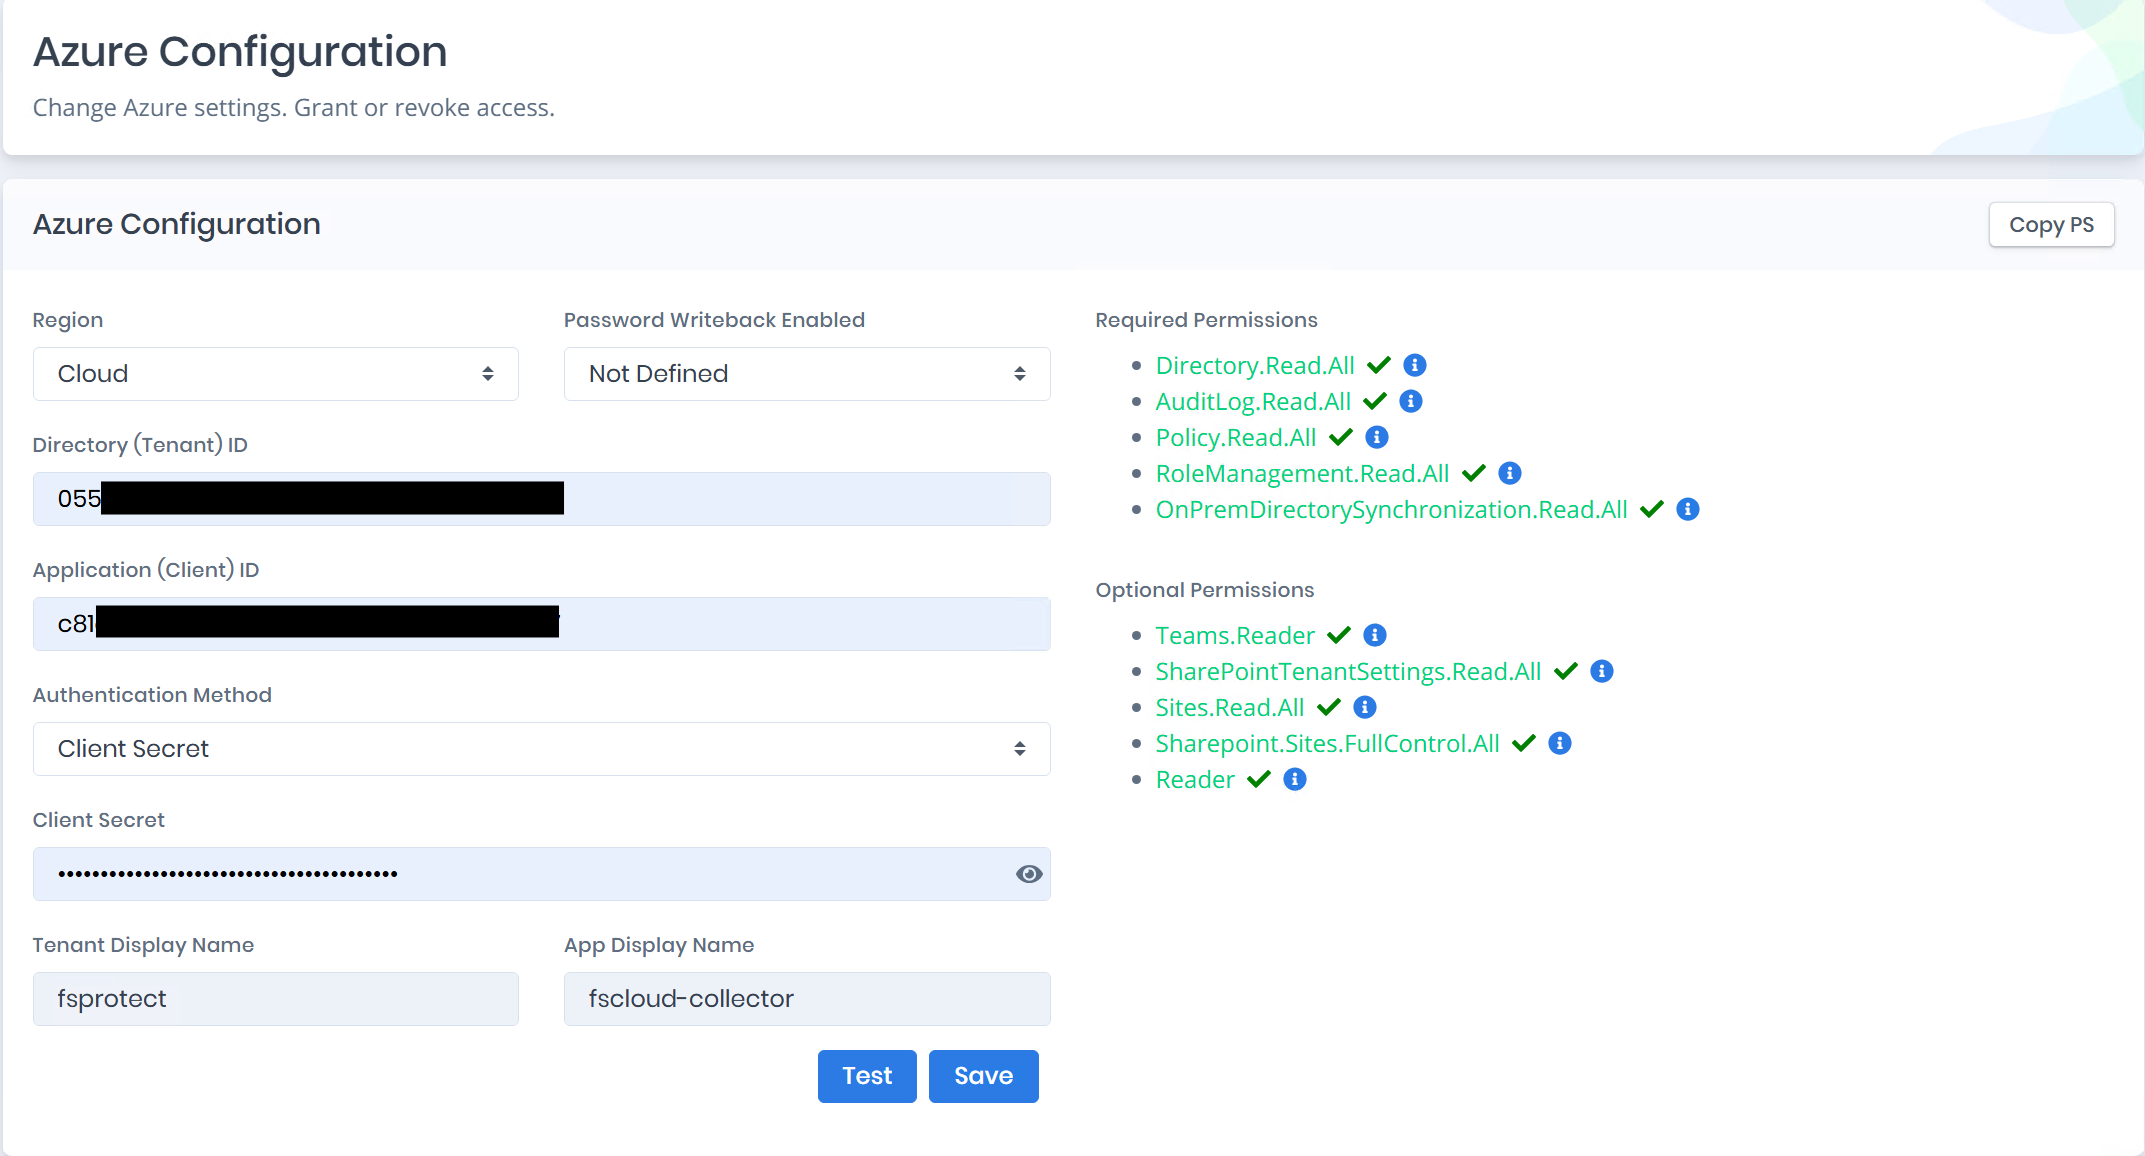
The Azure Configuration page is reached from [Configuration Center](/fsprotect/configuration-center.md) > **Microsoft Azure**. The form on the left holds the credentials:

**Region:** The Azure cloud the tenant lives in, for example `Cloud`.

**Password Writeback Enabled:** Whether password writeback to on-premises Active Directory is in use. Leave it as `Not Defined` when it is not known.

**Directory (Tenant) ID** and **Application (Client) ID:** The identifiers copied from the app registration.

**Authentication Method:** `Client Secret` or `Certificate`. A certificate is recommended, and is required for the app-only Teams PowerShell calls.

**Tenant Display Name** and **App Display Name:** Filled in by the product once the connection has been tested, and used to label the configuration.

**Test** checks the credentials against the tenant without saving; **Save** stores the configuration.

The panel on the right lists the API permissions the application needs, each with a help link explaining what it is used for. **Required Permissions** must all be granted for a scan to complete: `Directory.Read.All`, `AuditLog.Read.All`, `Policy.Read.All`, `RoleManagement.Read.All`, `OnPremDirectorySynchronization.Read.All`. **Optional Permissions** extend the scan into Teams and SharePoint, and can be left ungranted if those modules are not needed: `Teams.Reader`, `SharePointTenantSettings.Read.All`, `Sites.Read.All`, `Sharepoint.Sites.FullControl.All`, `Reader`.

### Generated Setup Script

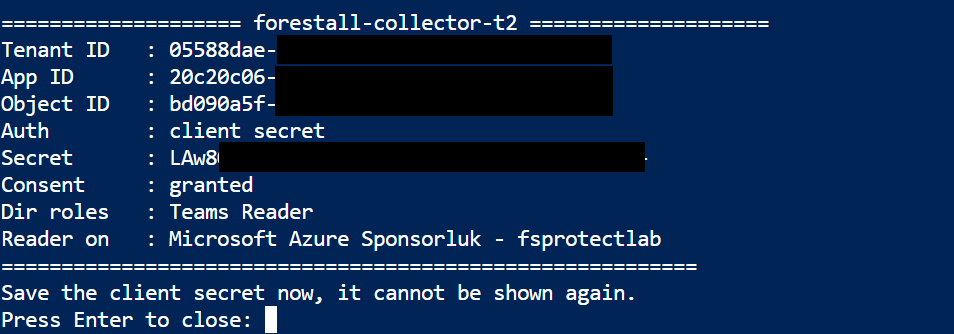
**Copy PS** opens the setup script generated for this tenant, with a copy button in its corner. Run it as a Global Administrator in Cloud Shell or a local PowerShell session. It performs the whole registration in one pass:

1. Installs the Azure CLI if it is missing.
2. Creates the app registration and adds the API permissions.
3. Creates the service principal.
4. Creates a certificate, or a client secret if one was chosen instead.
5. Grants admin consent.
6. Assigns the Teams Reader directory role.
7. Assigns the Reader role on every Azure subscription.

The script is safe to run more than once: anything that already exists is reused rather than recreated. The settings at the top can be edited before running it, notably `$appName` (default `forestall-collector`), `$useCertificate` and `$certYears`, `$assignSubscriptionReader`, and `$subId`, which limits the Reader assignment to a single subscription instead of every subscription the signed-in account can see.

### Step 1: Register the Application in Azure AD (if not already registered)

* [ ] Sign in to the Azure Portal.
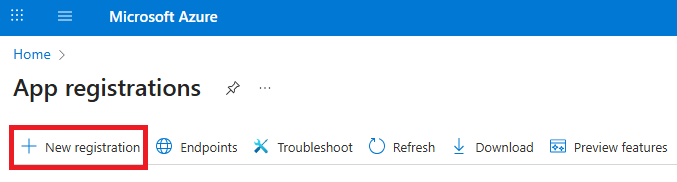
* [ ] Navigate to **Microsoft Azure** > **App registrations**.

<figure><img src="https://3408039743-files.gitbook.io/~/files/v0/b/gitbook-x-prod.appspot.com/o/spaces%2FObpV44hoVkNmo5bFuVVL%2Fuploads%2Fgit-blob-33b7f038de8e656ded0915e18b7094292456a3a4%2Fapp-registrations.png?alt=media" alt=""><figcaption><p>App registrations</p></figcaption></figure>

* [ ] Click **New registration**.

<figure><img src="https://3408039743-files.gitbook.io/~/files/v0/b/gitbook-x-prod.appspot.com/o/spaces%2FObpV44hoVkNmo5bFuVVL%2Fuploads%2Fgit-blob-1aa87a1312480173eeae068481b20234a1def906%2Fnew-registration.png?alt=media" alt=""><figcaption><p>New Registration</p></figcaption></figure>

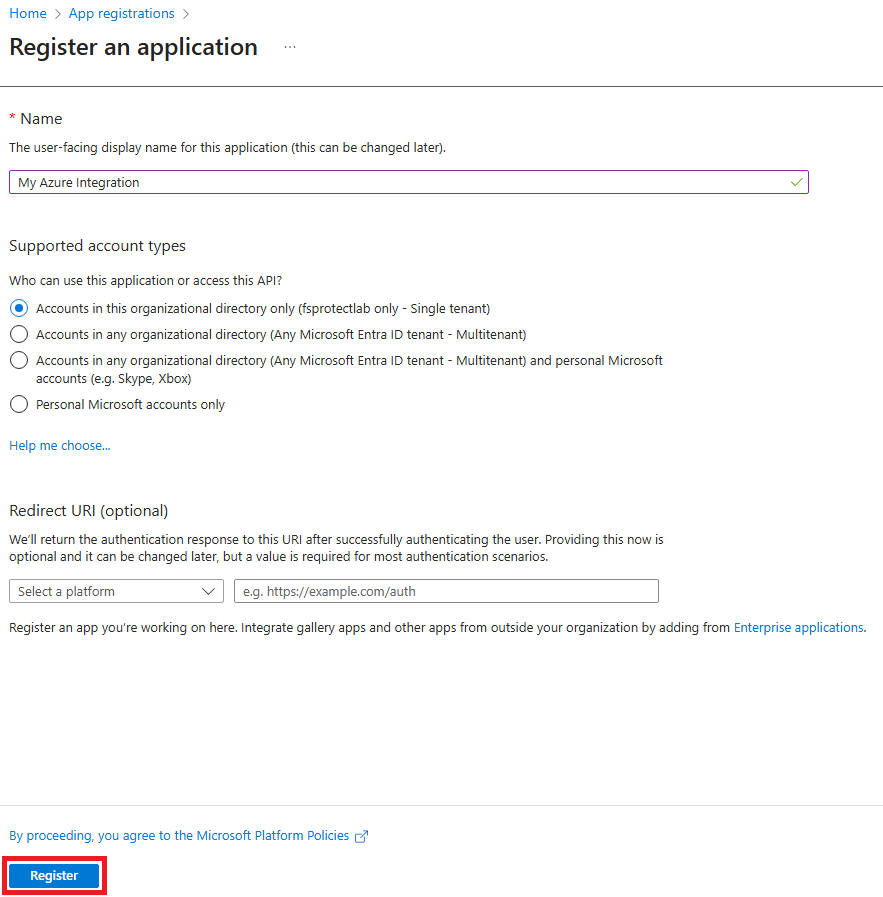
* [ ] Provide a **name** for the app (e.g., `My Azure Integration`).
* [ ] Set **Supported account types** to *Accounts in this organizational directory only* (unless you require multi-tenant).
* [ ] Set a **Redirect URI** if needed (optional).
* [ ] Click **Register**.

<figure><img src="https://3408039743-files.gitbook.io/~/files/v0/b/gitbook-x-prod.appspot.com/o/spaces%2FObpV44hoVkNmo5bFuVVL%2Fuploads%2Fgit-blob-c0c520fed065eb1196de99a80ba2f79479001c97%2Fregister.png?alt=media" alt=""><figcaption><p>Register</p></figcaption></figure>

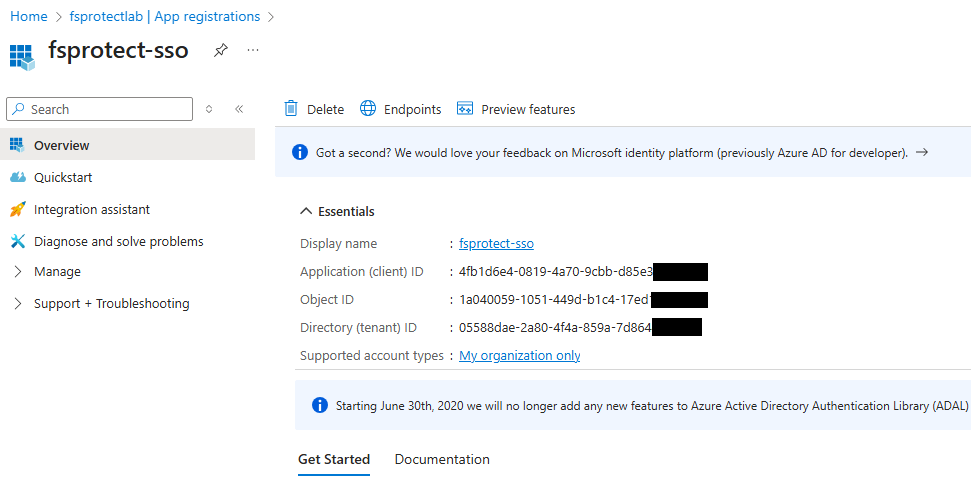
* [ ] After App Registration you must copy the Application (client) ID and Directory (tenant) ID

<figure><img src="https://3408039743-files.gitbook.io/~/files/v0/b/gitbook-x-prod.appspot.com/o/spaces%2FObpV44hoVkNmo5bFuVVL%2Fuploads%2Fgit-blob-8c0ca8439f155e7e18f77f727c9e17e21c33c973%2Fafter-app-registration.png?alt=media" alt=""><figcaption><p>After App Registration</p></figcaption></figure>

* [ ] Set up Azure Active Directory integration in the application for enterprise authentication and Microsoft 365 service access. Configure tenant credentials, client authentication, and API permissions. Please continue with [Login With Client Secret](/fsprotect/configuration-center/azure-configurations/login-with-client-secret.md). But we recommend to continue with [Login With Certificate](/fsprotect/configuration-center/azure-configurations/login-with-certificate.md).

### Step 2: Assign Required API Permissions

* [ ] Open the **App Registration** you just created.

<figure><img src="https://3408039743-files.gitbook.io/~/files/v0/b/gitbook-x-prod.appspot.com/o/spaces%2FObpV44hoVkNmo5bFuVVL%2Fuploads%2Fgit-blob-b0f2d2ba8e1921274fd64394bbd429363562be60%2Fapi-permissions.png?alt=media" alt=""><figcaption><p>API Permissions</p></figcaption></figure>

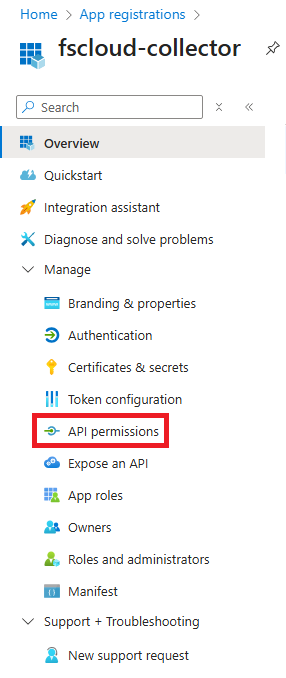
* [ ] Go to **API permissions** > Click **+ Add a permission**.

<figure><img src="https://3408039743-files.gitbook.io/~/files/v0/b/gitbook-x-prod.appspot.com/o/spaces%2FObpV44hoVkNmo5bFuVVL%2Fuploads%2Fgit-blob-9014a4f7fdee0d2397fedec2e5632daf95288402%2Fadd-a-permission.png?alt=media" alt=""><figcaption></figcaption></figure>

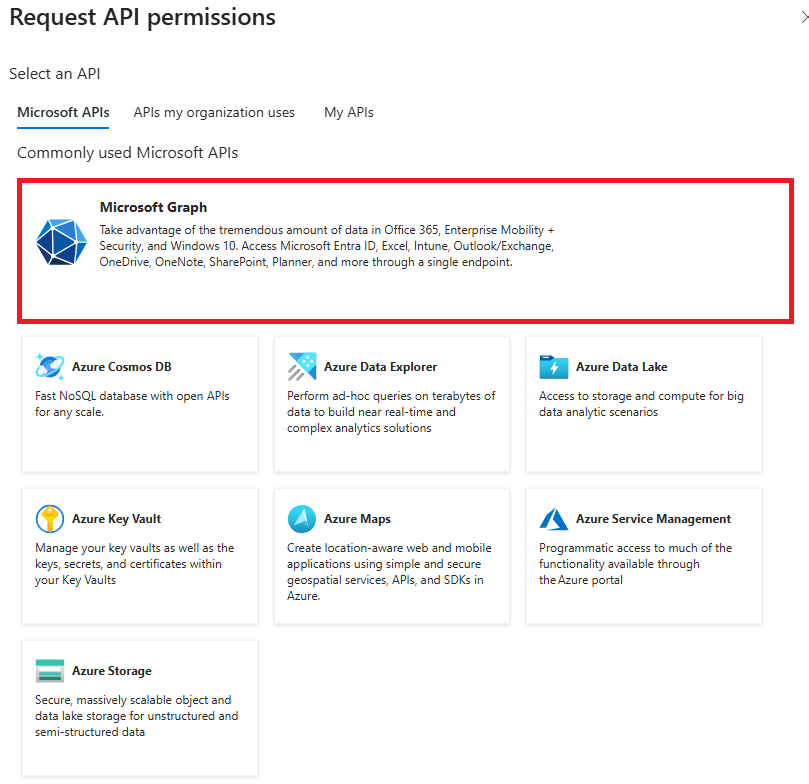
* [ ] Choose **Microsoft Graph**.

<figure><img src="https://3408039743-files.gitbook.io/~/files/v0/b/gitbook-x-prod.appspot.com/o/spaces%2FObpV44hoVkNmo5bFuVVL%2Fuploads%2Fgit-blob-5f9545a7d23511cfe8869e6006582a45f3f53241%2Fmicrosoft-graph.png?alt=media" alt=""><figcaption><p>Microsoft Graph</p></figcaption></figure>

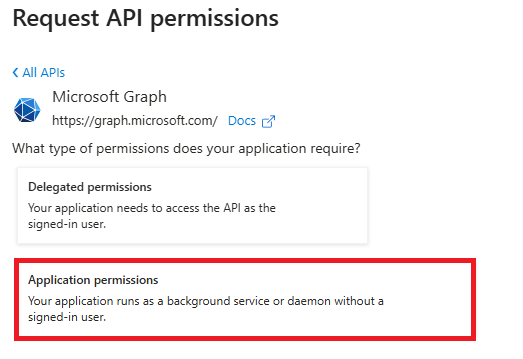
* [ ] Select **Application permissions**.

<figure><img src="https://3408039743-files.gitbook.io/~/files/v0/b/gitbook-x-prod.appspot.com/o/spaces%2FObpV44hoVkNmo5bFuVVL%2Fuploads%2Fgit-blob-30bd04f4630ac82e07cf5aff91672ce2aa8dae92%2Fapplication-permissions.png?alt=media" alt=""><figcaption><p>Application permissions</p></figcaption></figure>

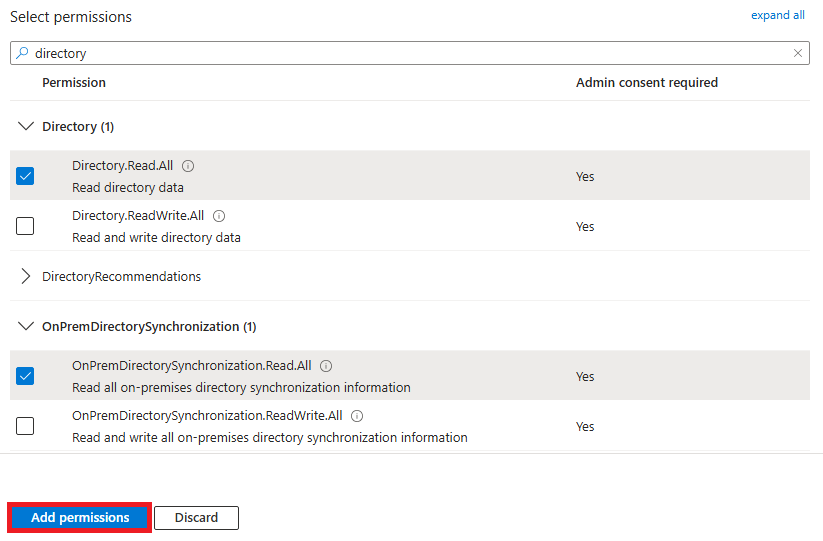
* [ ] Add the following permissions:
  * `Directory.Read.All`
  * `AuditLog.Read.All`
  * `Policy.Read.All`
  * `RoleManagement.Read.All`
  * `OnPremDirectorySynchronization.Read.All`
* [ ] The following permission are required if you scan Teams and Sharepoints:
  * `Teams Reader Role` [#what-is-teams-reader-role](#what-is-teams-reader-role "mention")
  * `SharePointTenantSettings.Read.All`
  * `Sites.Read.All`
  * `Sharepoint.Sites.FullControl.All`
* [ ] The following permission are required if you scan Azure Resource Management:

- Reader Role in ARM [#what-is-reader-role-in-azure-resource-manager-arm](#what-is-reader-role-in-azure-resource-manager-arm "mention")

* [ ] Click **Add permissions**.

<figure><img src="https://3408039743-files.gitbook.io/~/files/v0/b/gitbook-x-prod.appspot.com/o/spaces%2FObpV44hoVkNmo5bFuVVL%2Fuploads%2Fgit-blob-242cf348397b6c2a9b2edfb0999030166589d7da%2Fadd-permission.png?alt=media" alt=""><figcaption><p>Add Permissions</p></figcaption></figure>

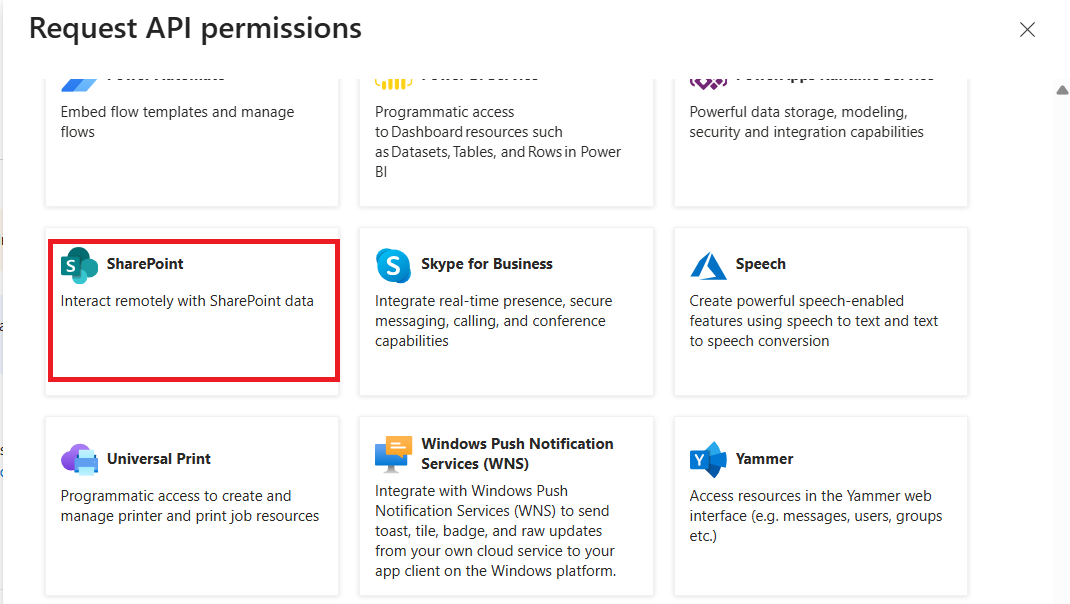
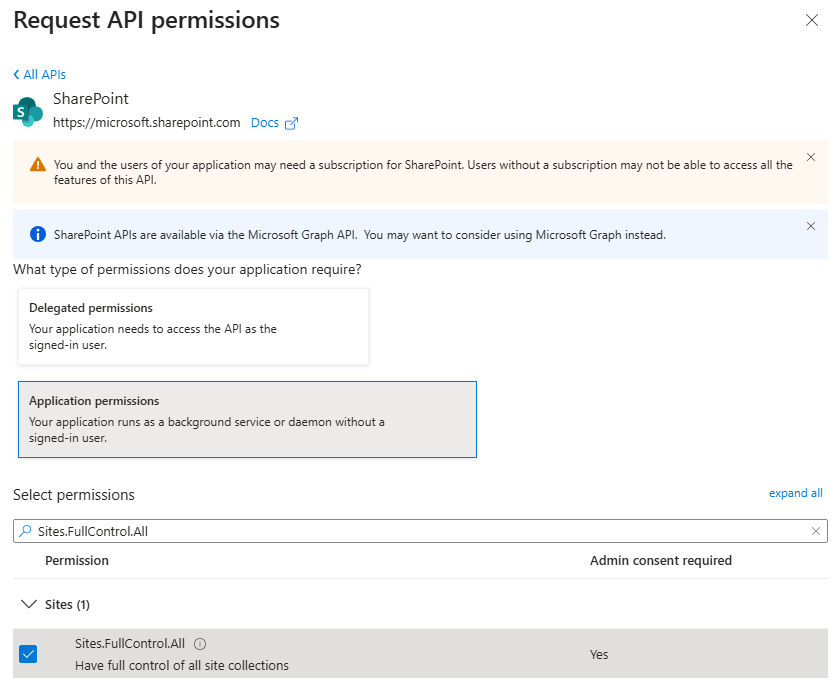
* To add `Sharepoint.Sites.FullControl.All` permission, select SharePoint instead of Microsoft Graph at Microsoft APIs tab and choose application permissions.

<figure><img src="https://3408039743-files.gitbook.io/~/files/v0/b/gitbook-x-prod.appspot.com/o/spaces%2FObpV44hoVkNmo5bFuVVL%2Fuploads%2Fgit-blob-4fbf6f7d2de2fb31856519c313574c4912aef03c%2Fsettings-azure-configurations-image-1.png?alt=media" alt=""><figcaption><p>Sharepoint API Selection</p></figcaption></figure>

* Type `Sites.FullControl.All` to find permission.

<figure><img src="https://3408039743-files.gitbook.io/~/files/v0/b/gitbook-x-prod.appspot.com/o/spaces%2FObpV44hoVkNmo5bFuVVL%2Fuploads%2Fgit-blob-73cd89fd46dce6e1ffbe8ba948051f71eafd9c73%2Fsettings-azure-configurations-image-2.png?alt=media" alt=""><figcaption><p>Add Permissions</p></figcaption></figure>

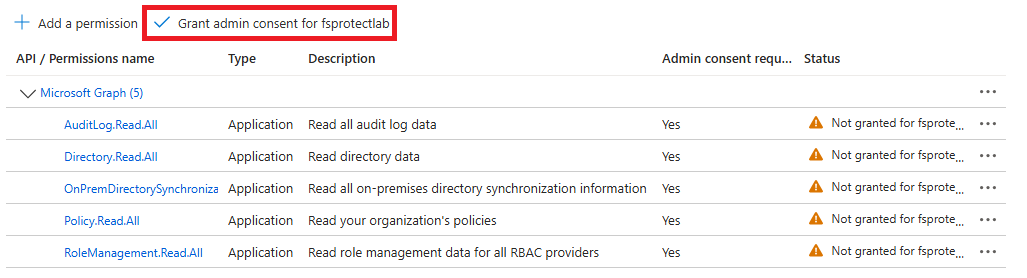
* [ ] After adding, click **Grant admin consent for \[Your Tenant Name]**.

<figure><img src="https://3408039743-files.gitbook.io/~/files/v0/b/gitbook-x-prod.appspot.com/o/spaces%2FObpV44hoVkNmo5bFuVVL%2Fuploads%2Fgit-blob-3467a3723d79191290383aa6f77591b3c4317b40%2Fgrant-admin-consent.png?alt=media" alt=""><figcaption><p>Grant admin consent</p></figcaption></figure>

* [ ] Confirm the prompt to grant consent.

<figure><img src="https://3408039743-files.gitbook.io/~/files/v0/b/gitbook-x-prod.appspot.com/o/spaces%2FObpV44hoVkNmo5bFuVVL%2Fuploads%2Fgit-blob-64530dbac65a92c7c4f4f92a33a15011f6a53d64%2Fgrant-admin-consent-confirmation.png?alt=media" alt=""><figcaption><p>Grant admin consent confirmation</p></figcaption></figure>

These permissions allow the integration to securely access directory, audit, policy, role, and hybrid sync data.

***

### What is Reader Role in Azure Resource Manager (ARM)?

Reader role in Azure Resource Manager (ARM) lets users view all Azure resources and their configurations without being able to make any changes. This is a built-in Azure RBAC (Role-Based Access Control) role that grants read-only access to subscription-level resources such as virtual machines, storage accounts, networking, and resource groups — ensuring the application can scan and inventory your Azure infrastructure without modifying anything.

The following permission is required if you scan Azure Resource Manager:

* `Reader` role assigned at the **Subscription** scope

**Step 1: Navigate to Your Subscription**

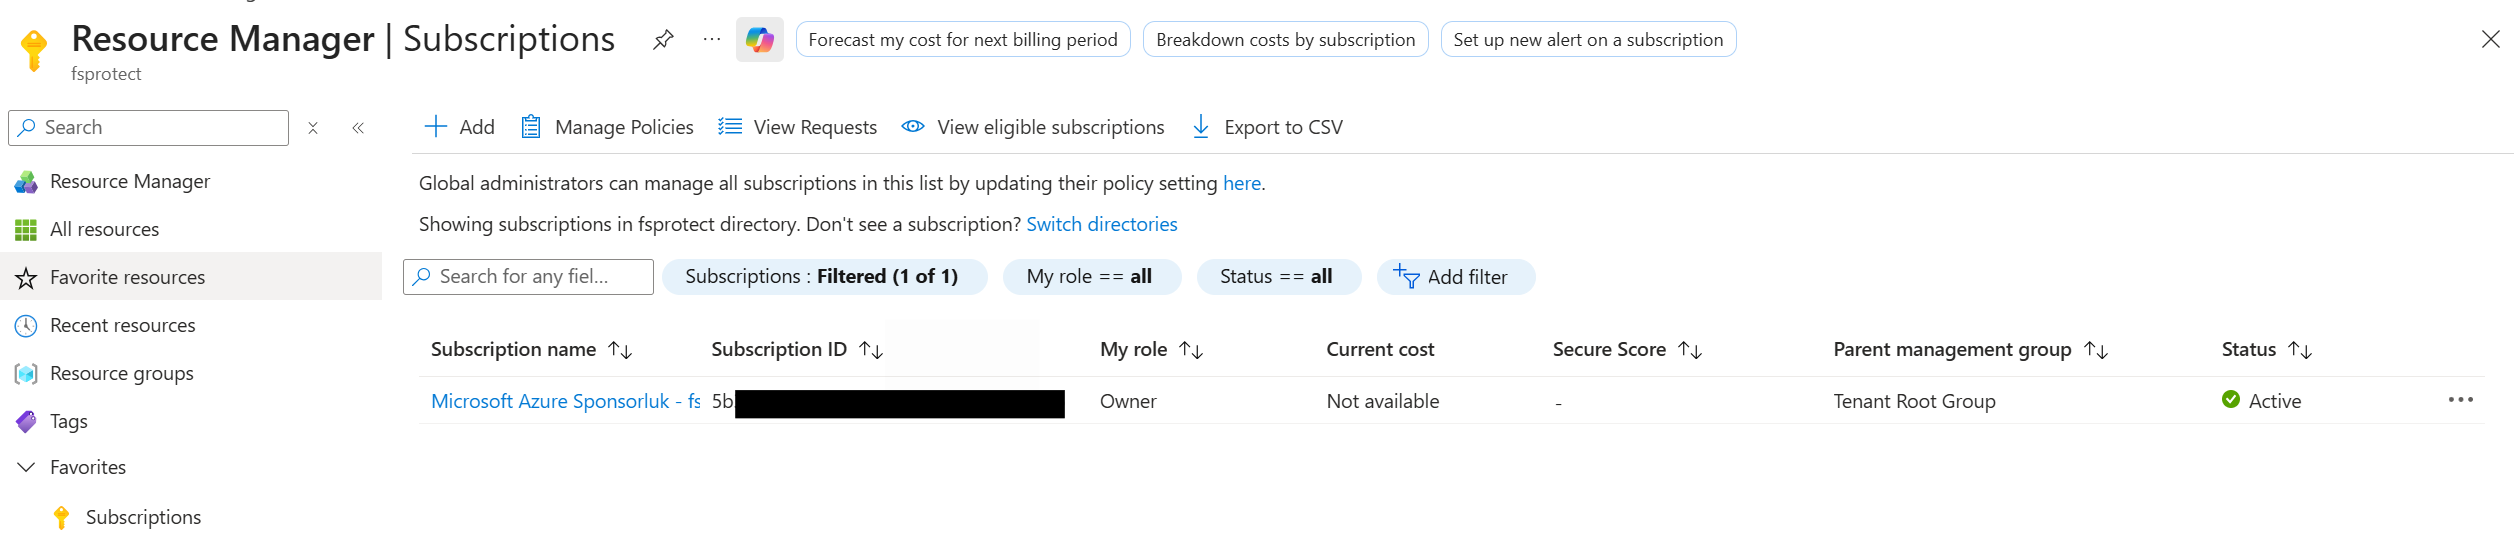
1. Sign in to the [Azure Portal](https://portal.azure.com/).
2. In the search bar at the top, type **Subscriptions** and select **Subscriptions** from the results.
3. Click on the **Subscription** you want to grant access to.

<figure><img src="https://3408039743-files.gitbook.io/~/files/v0/b/gitbook-x-prod.appspot.com/o/spaces%2FObpV44hoVkNmo5bFuVVL%2Fuploads%2Fgit-blob-6710ead49d9f95936dda675b479a272f6362a5c2%2FAzure-Subscription-Page.png?alt=media" alt=""><figcaption></figcaption></figure>

**Step 2: Open Access Control (IAM)**

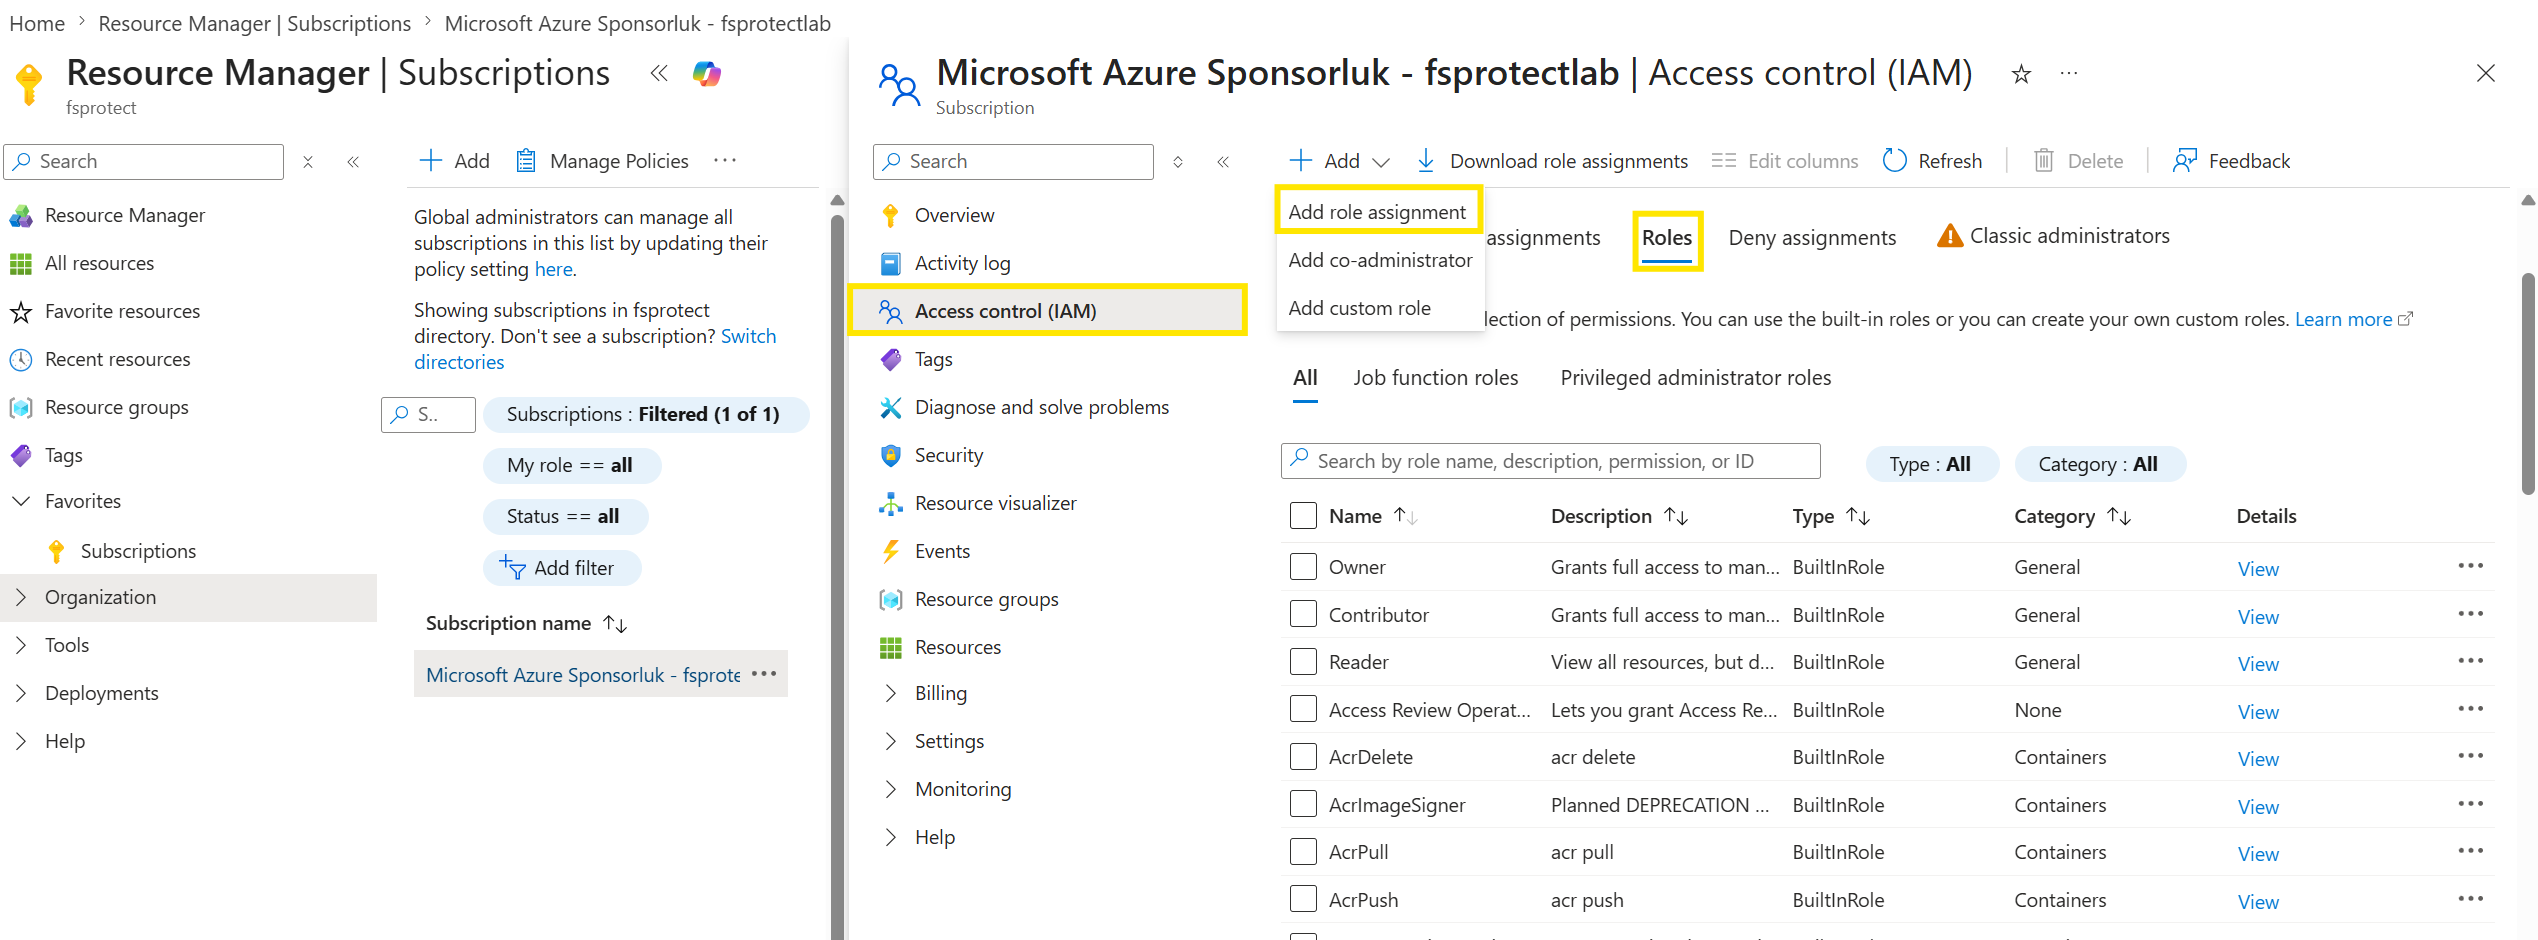
1. In the left-hand menu of your subscription, click **Access control (IAM)**.
2. Click **+ Add** and select **Add role assignment** from the dropdown.

<figure><img src="https://3408039743-files.gitbook.io/~/files/v0/b/gitbook-x-prod.appspot.com/o/spaces%2FObpV44hoVkNmo5bFuVVL%2Fuploads%2Fgit-blob-dccb60288bb7d1b629aa630db7e611373dbd5563%2FAzure-Subscription-Page-Add-Role.png?alt=media" alt=""><figcaption></figcaption></figure>

**Step 3: Select the Reader Role**

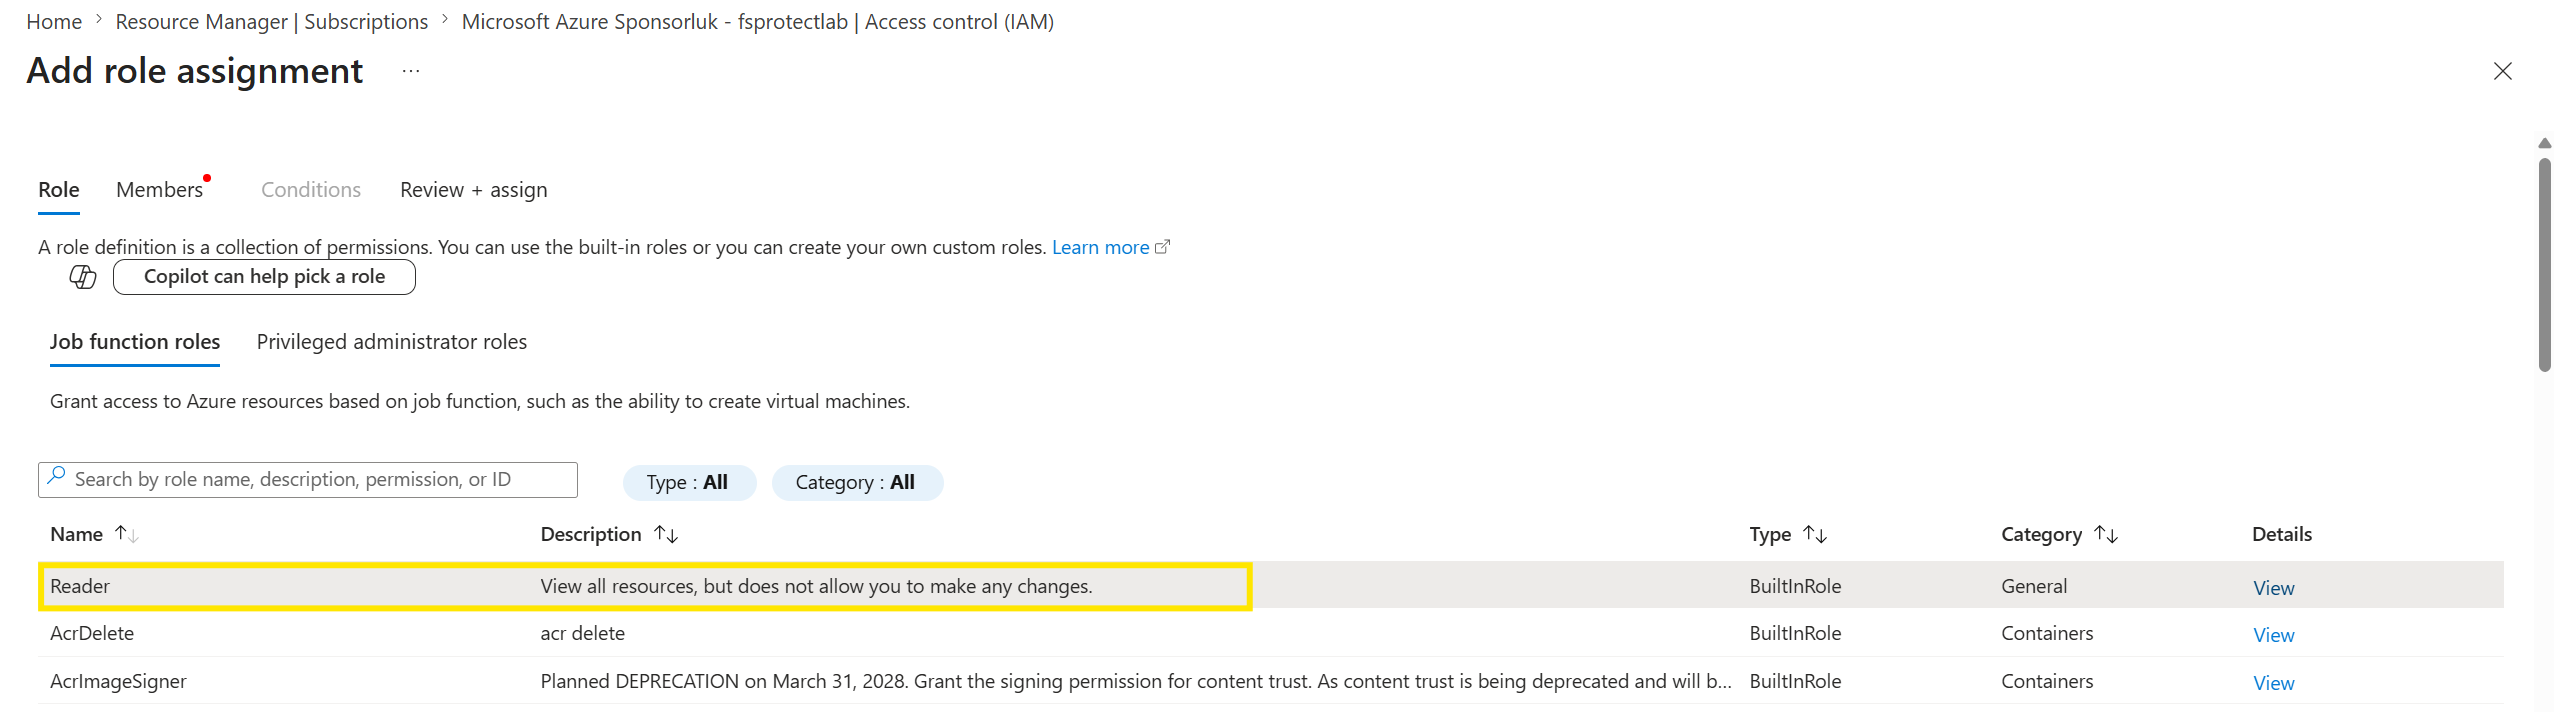
1. In the **Role** tab, search for **Reader** in the search box.
2. Select the **Reader** role from the list. The description says: *"View all resources, but does not allow you to make any changes."*
3. Click **Next**.

<figure><img src="https://3408039743-files.gitbook.io/~/files/v0/b/gitbook-x-prod.appspot.com/o/spaces%2FObpV44hoVkNmo5bFuVVL%2Fuploads%2Fgit-blob-c7a36e5498e1fb533f896887ce6f239f3bc3a950%2FAzure-Subscription-Page-Add-Role-Reader-Role-Selection.png?alt=media" alt=""><figcaption></figcaption></figure>

**Step 4: Assign Access to the Application**

1. In the **Members** tab, set **Assign access to** → **User, group, or service principal**.
2. Click **+ Select members**.
3. In the search box, type the name of your registered application (e.g., `forestall-collector`) and select it from the results.
4. Click **Select**, then click **Next**.

<figure><img src="https://3408039743-files.gitbook.io/~/files/v0/b/gitbook-x-prod.appspot.com/o/spaces%2FObpV44hoVkNmo5bFuVVL%2Fuploads%2Fgit-blob-7bd4e7db50c582ed9c1013c79a85fbb730fa7401%2FAzure-Subscription-Page-Add-Role-Reader-ServicePrincipal-Selection%20(1).png?alt=media" alt=""><figcaption></figcaption></figure>

**Step 5: Review and Assign**

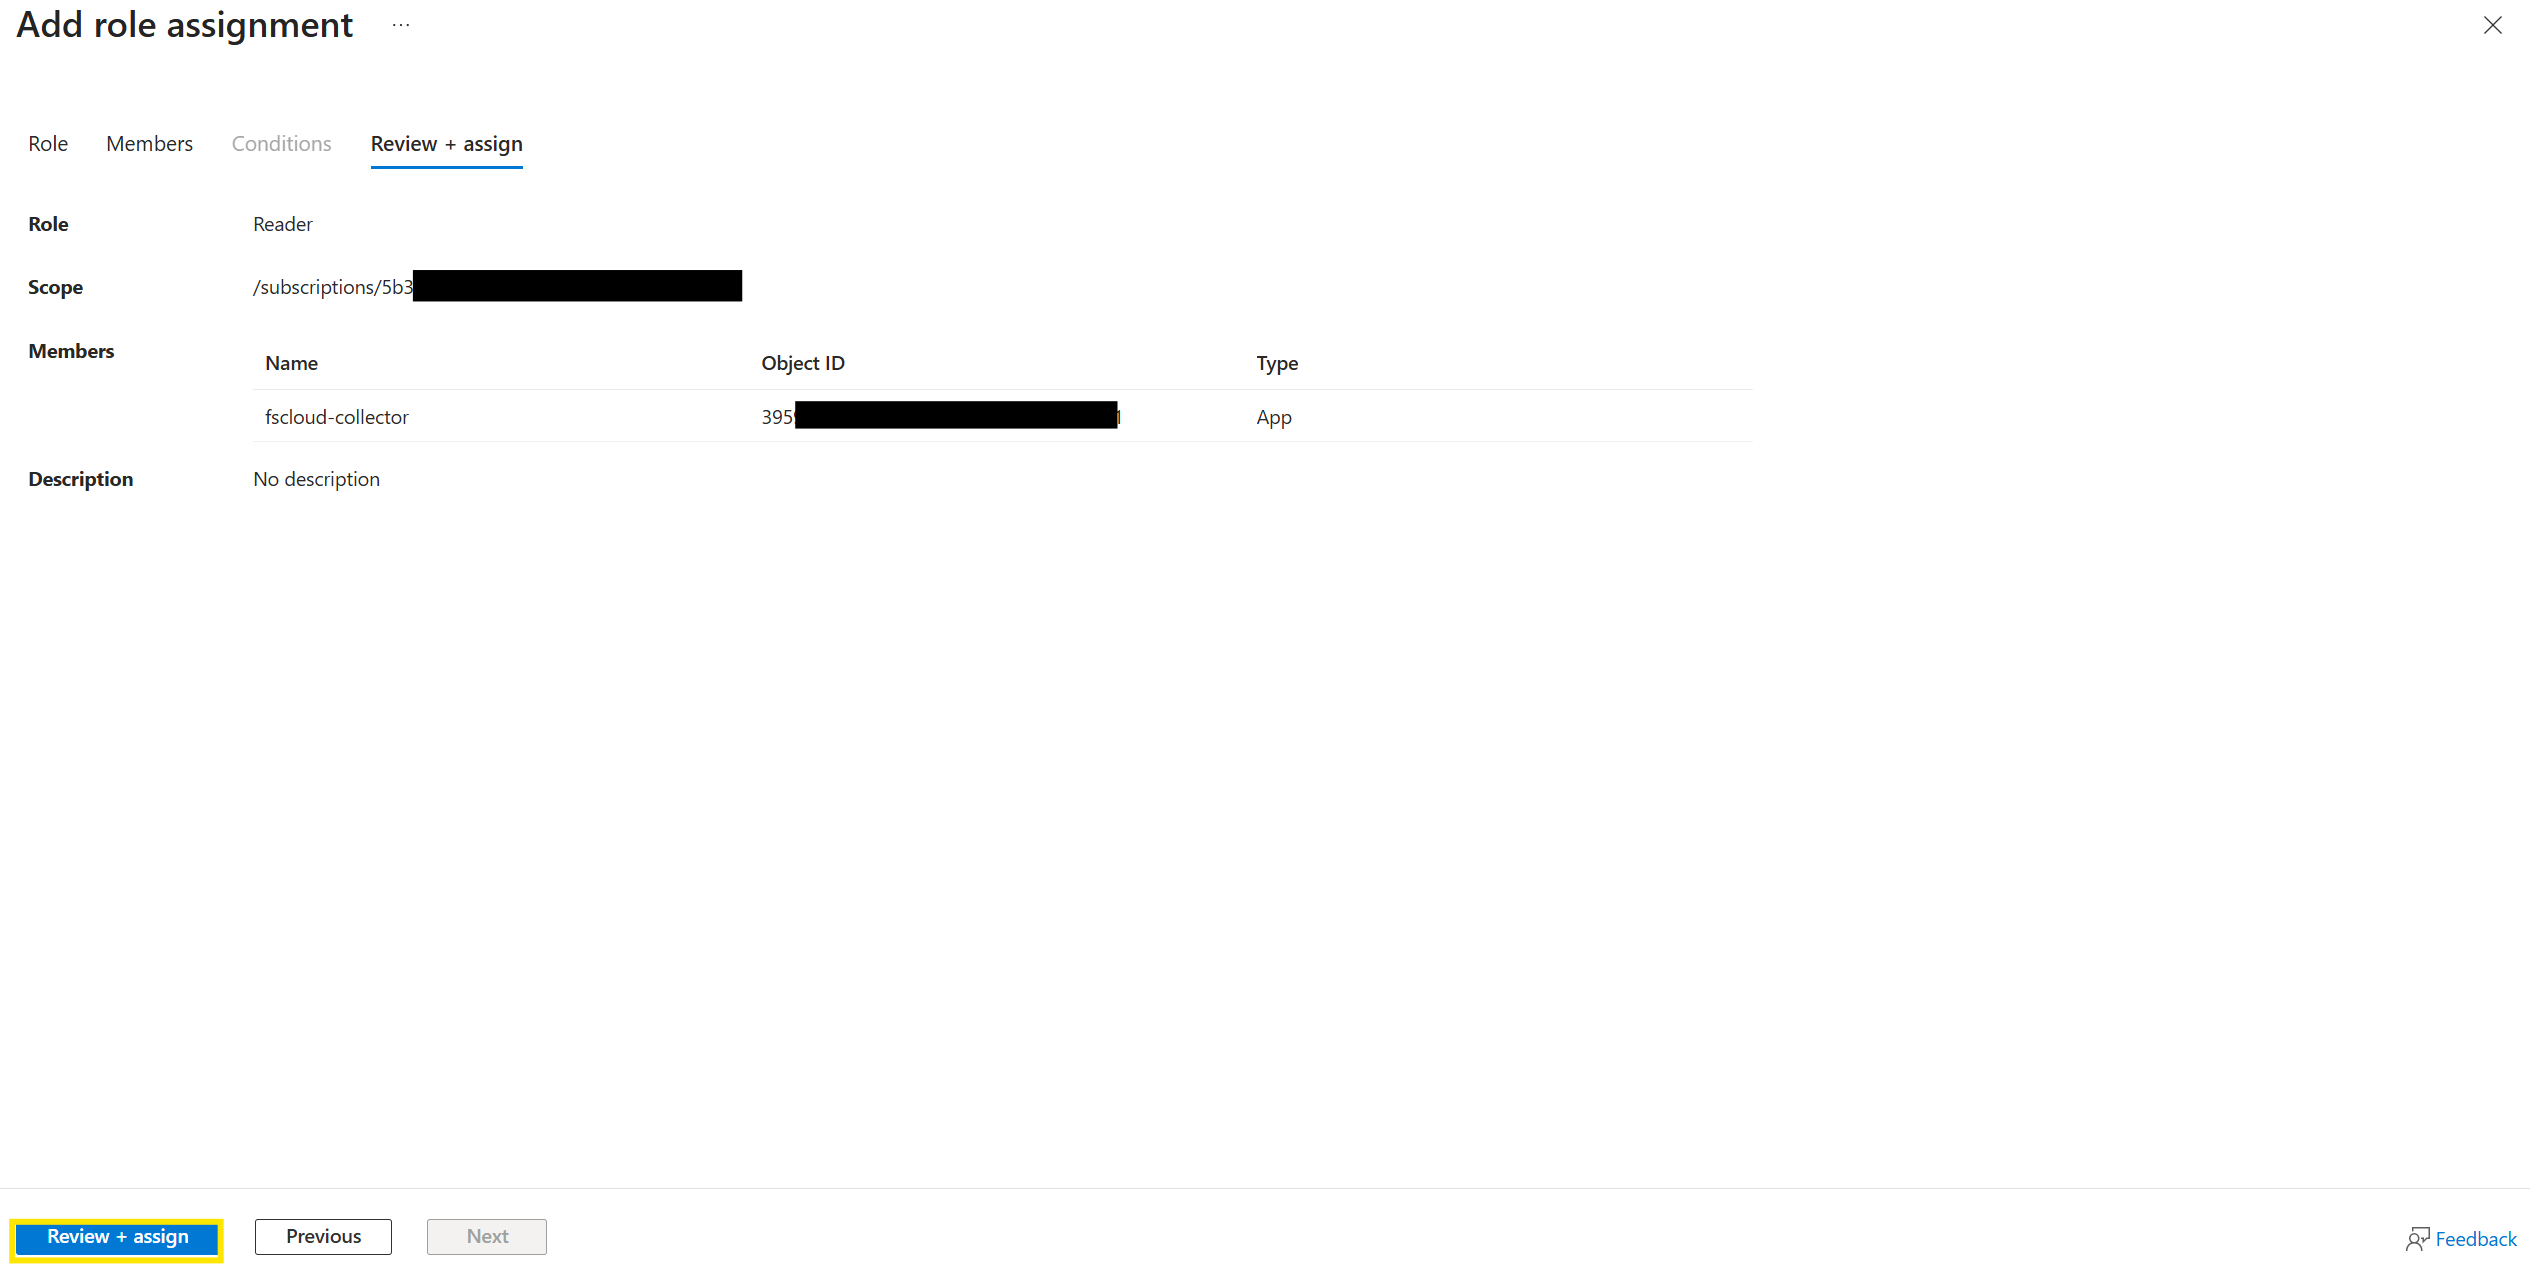
1. In the **Review + assign** tab, verify the following:
   * **Role**: Reader
   * **Scope**: The selected subscription
   * **Members**: Your application (service principal)
2. Click **Review + assign** to complete the assignment.

<figure><img src="https://3408039743-files.gitbook.io/~/files/v0/b/gitbook-x-prod.appspot.com/o/spaces%2FObpV44hoVkNmo5bFuVVL%2Fuploads%2Fgit-blob-a99e6af6ddb17375785417e27866c76fd3771e0a%2FAzure-Subscription-Page-Add-Role-Reader-Review-And-Assign.png?alt=media" alt=""><figcaption></figcaption></figure>

**Verify the Role Assignment**

1. Go back to **Access control (IAM)** on the subscription.
2. Click the **Role assignments** tab.
3. Search for your application name to confirm the **Reader** role is listed.

**Note:** If you need to scan resources across multiple subscriptions, repeat these steps for each subscription. Alternatively, you can assign the Reader role at the **Management Group** level to cover all subscriptions under that group.

***

### What is Teams Reader Role?

Teams Reader role lets users view Teams settings and information without being able to change anything.

#### Step 1: Search for Roles

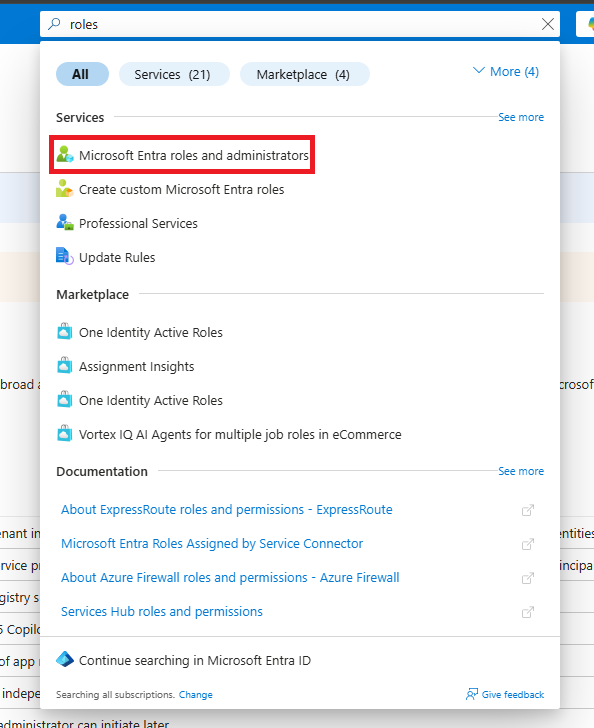
Go to the Microsoft Entra admin center and type "roles" in the search box at the top.

<figure><img src="https://3408039743-files.gitbook.io/~/files/v0/b/gitbook-x-prod.appspot.com/o/spaces%2FObpV44hoVkNmo5bFuVVL%2Fuploads%2Fgit-blob-842d2e51dd57d6b0c547b13adbb7c2dcc9a40232%2Fsettings-azure-configurations-image-3.png?alt=media" alt=""><figcaption><p>Search roles</p></figcaption></figure>

Click on **Microsoft Entra roles and administrators** from the Services section.

#### Step 2: Find Teams Reader Role

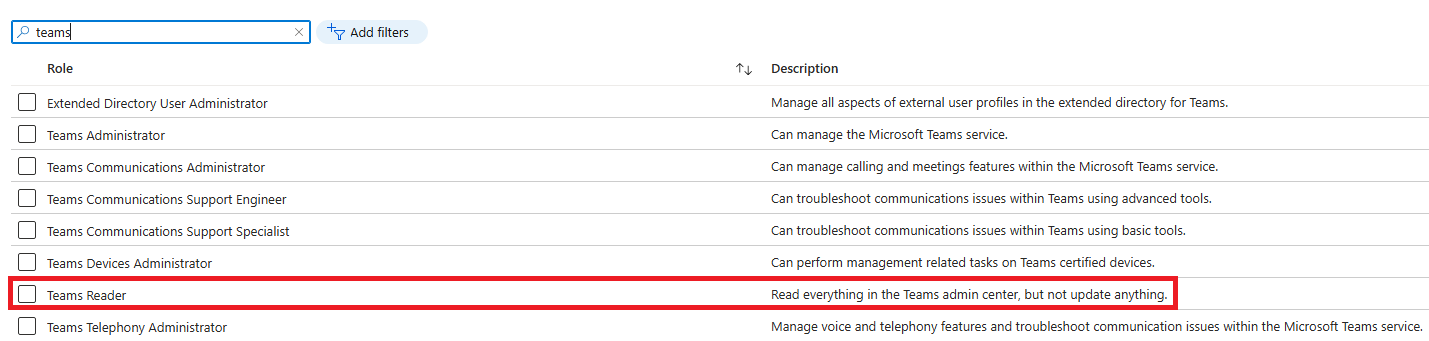
In the roles page, search for "teams" to find Teams-related roles.

<figure><img src="https://3408039743-files.gitbook.io/~/files/v0/b/gitbook-x-prod.appspot.com/o/spaces%2FObpV44hoVkNmo5bFuVVL%2Fuploads%2Fgit-blob-13c5d1b274856e922974f36c8f70410d19481fb5%2Fsettings-azure-configurations-image-4.png?alt=media" alt=""><figcaption><p>Teams Reader Role</p></figcaption></figure>

Look for **Teams Reader** role. The description says: "Read everything in the Teams admin center, but not update anything."

#### Step 3: Add Users or Groups

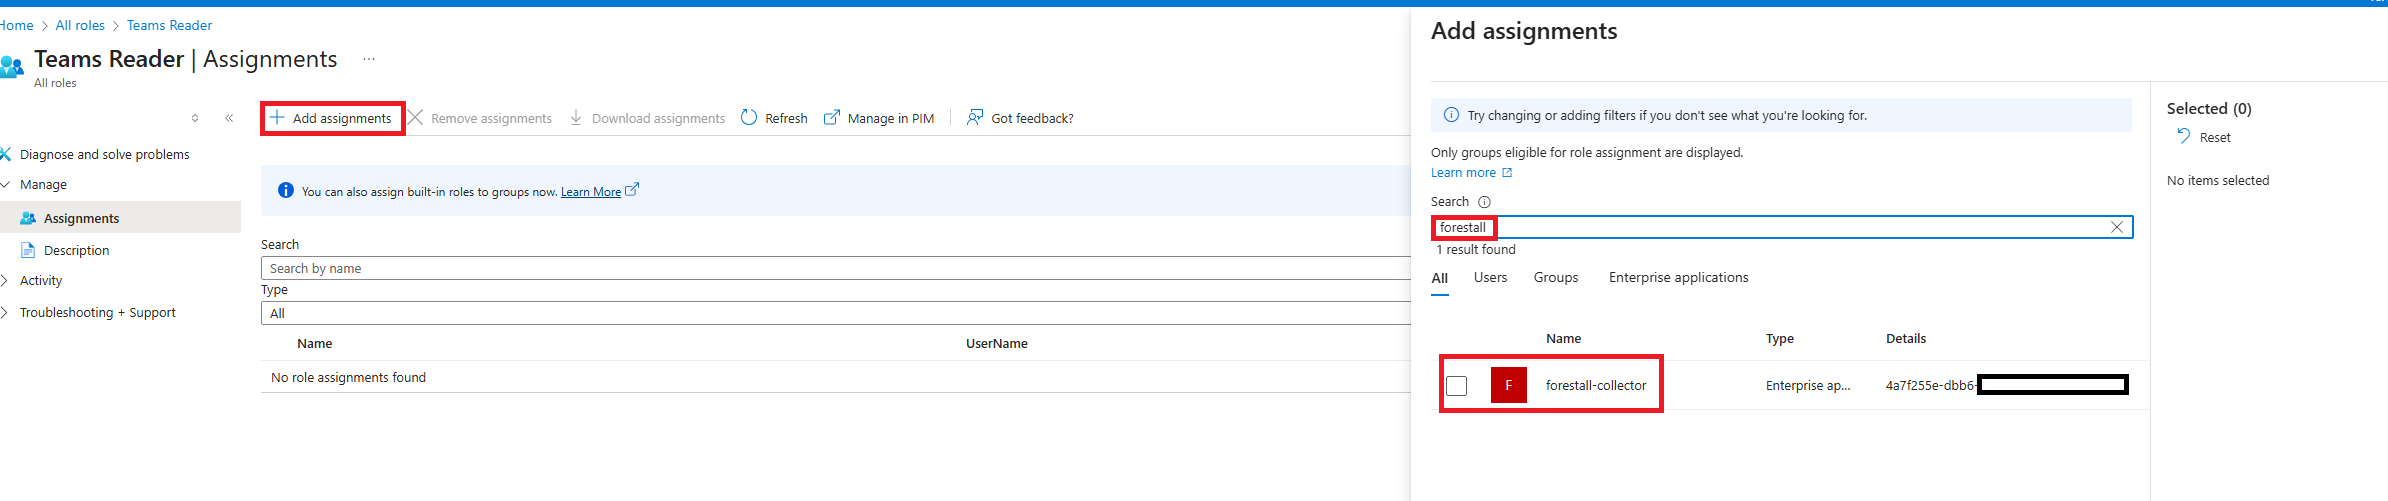
Click on the Teams Reader role, then go to **Assignments** and click **Add assignments**.

<figure><img src="https://3408039743-files.gitbook.io/~/files/v0/b/gitbook-x-prod.appspot.com/o/spaces%2FObpV44hoVkNmo5bFuVVL%2Fuploads%2Fgit-blob-094d1c61f0b48ac89223023c401edbabf8c812ab%2Fsettings-azure-configurations-image-5.png?alt=media" alt=""><figcaption><p>Team Reader Assignments</p></figcaption></figure>

Search for the user, group, or application you want to give this role to. In this example, we searched for "forestall" and found the "forestall-collector" enterprise application.

Select the item from the search results and add it.

***

### (Optional Step 1): Use PowerShell Script to Automate Permission Assignment

If you prefer to automate the process or deploy across multiple tenants, you can use the following PowerShell script (requires admin privileges and AzureAD or Microsoft Graph modules).

#### PowerShell Script: Assign Microsoft Graph Permissions to an App

**Preconditions:**

* You must be a **Global Administrator**
* The application must be registered and you must have its **App ID (Client ID)**

**Steps:**

* [ ] Open Cloud Shell from navbar

<figure><img src="https://3408039743-files.gitbook.io/~/files/v0/b/gitbook-x-prod.appspot.com/o/spaces%2FObpV44hoVkNmo5bFuVVL%2Fuploads%2Fgit-blob-7c068d058f43234d84544a15bf2c7619918855bf%2Fcloud-shell.png?alt=media" alt=""><figcaption><p>Cloud Shell</p></figcaption></figure>

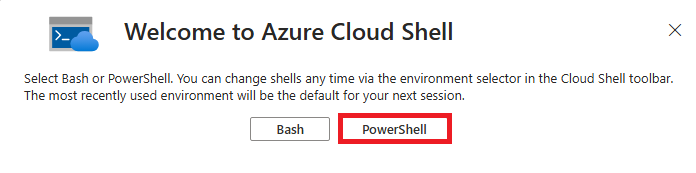
* [ ] Select PowerShell from modal

<figure><img src="https://3408039743-files.gitbook.io/~/files/v0/b/gitbook-x-prod.appspot.com/o/spaces%2FObpV44hoVkNmo5bFuVVL%2Fuploads%2Fgit-blob-47a63a14fc1ec502d2fcb63e2322151881af325d%2Fpowershell.png?alt=media" alt=""><figcaption><p>PowerShell</p></figcaption></figure>

* [ ] Save powershell script below as permissions.ps1

```
    #Requires -Version 5.1

    # ---------------------------------------------------------------------------
    # Sets up the forestall-collector app registration:
    #   1. Azure CLI (installed if missing)
    #   2. App registration + API permissions
    #   3. Service principal
    #   4. Certificate (default) or client secret
    #   5. Admin consent
    #   6. Teams Reader directory role
    #   7. Reader role on every Azure subscription
    #
    # Safe to run more than once - anything that already exists is reused.
    # ---------------------------------------------------------------------------


    # ============================ Settings =====================================

    $appName = "forestall-collector"

    # $true  = use a certificate (required for app-only Teams PowerShell)
    # $false = use a client secret instead
    $useCertificate = $true
    $certYears = 2

    $assignSubscriptionReader = $true   # give the app the Reader role on Azure subscriptions
    $pauseWhenDone = $true              # keep the window open so you can copy the output

    # Which subscription gets the Reader role.
    # The empty GUID below means "every subscription the signed-in account can see".
    # Put a single subscription id here to limit it to that one.
    $subId = "00000000-0000-0000-0000-000000000000"

    # Where the .cer and .pfx files are saved
    $outputDir = if ($PSScriptRoot) { $PSScriptRoot } else { (Get-Location).Path }

    # Microsoft Graph API
    $graphApiId = "00000003-0000-0000-c000-000000000000"
    $graphPermissions = @{
        "Directory.Read.All"                      = "7ab1d382-f21e-4acd-a863-ba3e13f7da61"
        "AuditLog.Read.All"                       = "b0afded3-3588-46d8-8b3d-9842eff778da"
        "Policy.Read.All"                         = "246dd0d5-5bd0-4def-940b-0421030a5b68"
        "RoleManagement.Read.All"                 = "c7fbd983-d9aa-4fa7-84b8-17382c103bc4"
        "OnPremDirectorySynchronization.Read.All" = "bb70e231-92dc-4729-aff5-697b3f04be95"
        "SharePointTenantSettings.Read.All"       = "83d4163d-a2d8-4d3b-9695-4ae3ca98f888"
        "Sites.Read.All"                          = "332a536c-c7ef-4017-ab91-336970924f0d"
    }

    # SharePoint Online API
    $sharepointApiId = "00000003-0000-0ff1-ce00-000000000000"
    $sharepointPermissions = @{
        "Sites.FullControl.All" = "678536fe-1083-478a-9c59-b99265e6b0d3"
    }

    # Teams Reader = read everything in the Teams admin center. Optional, so it has
    # its own switch. Assigning it needs Privileged Role Administrator.
    $teamsReader = $true

    # Entra directory roles given to the service principal
    $directoryRoles = @{}
    if ($teamsReader) {
        $directoryRoles["Teams Reader"] = "1076ac91-f3d9-41a7-a339-dcdf5f480acc"
    }

    # Stop as soon as something goes wrong
    $ErrorActionPreference = "Stop"

    # Some Windows builds still default to old TLS, which Graph refuses
    [Net.ServicePointManager]::SecurityProtocol = [Net.SecurityProtocolType]::Tls12


    # ====================== Helper for the Graph calls =========================

    # Azure CLI has no command for directory roles, so those few calls go to
    # Microsoft Graph through "az rest". It reuses the CLI login, its proxy
    # settings and its network stack, which PowerShell's own web cmdlets do not.
    function Invoke-Graph {
        param($Method, $Url, $Body)

        if ($Body) {
            # Passing JSON on the command line gets mangled by PowerShell, so the
            # body goes through a temp file instead.
            $bodyFile = Join-Path ([IO.Path]::GetTempPath()) "graph-body.json"
            $Body | ConvertTo-Json -Compress | Set-Content $bodyFile -Encoding Ascii

            $result = az rest --method $Method --url $Url --headers "Content-Type=application/json" --body "@$bodyFile" --only-show-errors
            $azFailed = $LASTEXITCODE -ne 0
            Remove-Item $bodyFile -Force
        }
        else {
            $result = az rest --method $Method --url $Url --only-show-errors
            $azFailed = $LASTEXITCODE -ne 0
        }

        if ($azFailed) { throw "Graph call failed: $Method $Url" }

        # Empty answer for calls that return nothing, such as adding a member
        if ($result) { return ($result -join "`n" | ConvertFrom-Json) }
    }


    # ============================== Main =======================================

    $failed = $false
    $consentNote = "NOT granted - do it in the Azure Portal"
    $roleNotes = @()
    $subNotes = @()

    try {

        # ----- 1. Azure CLI ----------------------------------------------------

        if (-not (Get-Command az -ErrorAction SilentlyContinue)) {

            # The installer below is Windows only. Cloud Shell already has the CLI.
            if ($env:OS -ne "Windows_NT") {
                throw "Azure CLI is missing. Install it from https://aka.ms/installazurecli and run the script again."
            }

            Write-Host "Azure CLI not found, installing it..."

            if (Get-Command winget -ErrorAction SilentlyContinue) {
                winget install --exact --id Microsoft.AzureCLI --silent --accept-package-agreements --accept-source-agreements | Out-Null
            }
            else {
                $msi = Join-Path $env:TEMP "azure-cli.msi"
                Invoke-WebRequest "https://aka.ms/installazurecliwindows" -OutFile $msi -UseBasicParsing
                Start-Process msiexec.exe -ArgumentList "/i `"$msi`" /qn /norestart" -Wait -Verb RunAs
                Remove-Item $msi -Force
            }

            # Pick up the new PATH without opening a new window
            $env:Path = [Environment]::GetEnvironmentVariable("Path", "Machine") + ";" +
                        [Environment]::GetEnvironmentVariable("Path", "User")

            if (-not (Get-Command az -ErrorAction SilentlyContinue)) {
                throw "Could not install the Azure CLI. Install it from https://aka.ms/installazurecli and run this script again."
            }
            Write-Host "Azure CLI installed."
        }


        # ----- 2. Signed in tenant ---------------------------------------------

        $tenantId = az account show --query tenantId -o tsv --only-show-errors
        if ($LASTEXITCODE -ne 0) { throw "Not logged in to Azure CLI. Run 'az login' and start the script again." }


        # ----- 3. App registration ---------------------------------------------

        $appId = az ad app list --display-name $appName --query "[0].appId" -o tsv --only-show-errors
        if ($appId) {
            Write-Host "App registration '$appName' already exists, reusing it."
        }
        else {
            Write-Host "Creating app registration '$appName'..."
            $appId = az ad app create --display-name $appName --query appId -o tsv --only-show-errors
            if ($LASTEXITCODE -ne 0) { throw "App registration failed." }
        }


        # ----- 4. API permissions ----------------------------------------------

        foreach ($name in $graphPermissions.Keys) {
            Write-Host "Adding Graph permission $name"
            az ad app permission add --id $appId --api $graphApiId --api-permissions "$($graphPermissions[$name])=Role" --only-show-errors | Out-Null
            if ($LASTEXITCODE -ne 0) { throw "Failed to add $name" }
        }

        foreach ($name in $sharepointPermissions.Keys) {
            Write-Host "Adding SharePoint permission $name"
            az ad app permission add --id $appId --api $sharepointApiId --api-permissions "$($sharepointPermissions[$name])=Role" --only-show-errors | Out-Null
            if ($LASTEXITCODE -ne 0) { throw "Failed to add $name" }
        }


        # ----- 5. Service principal --------------------------------------------

        $spId = az ad sp list --filter "appId eq '$appId'" --query "[0].id" -o tsv --only-show-errors
        if ($spId) {
            Write-Host "Service principal already exists."
        }
        else {
            Write-Host "Creating service principal..."
            $spId = az ad sp create --id $appId --query id -o tsv --only-show-errors
            if ($LASTEXITCODE -ne 0) { throw "Service principal creation failed." }
        }


        # ----- 6. Certificate or client secret ---------------------------------

        if ($useCertificate) {

            $cerPath = Join-Path $outputDir "$appName.cer"   # public key, goes to Entra ID
            $pfxPath = Join-Path $outputDir "$appName.pfx"   # private key, goes to the collector

            # The certificate lives in these two files only. Nothing touches the
            # Windows certificate store, so this also works in Azure Cloud Shell
            # and on Linux.
            $cert = $null
            if (Test-Path $cerPath) {
                try {
                    $cert = New-Object System.Security.Cryptography.X509Certificates.X509Certificate2 $cerPath
                    if ($cert.NotAfter -lt (Get-Date).AddDays(30)) { $cert = $null }   # too close to expiry
                }
                catch { $cert = $null }   # unreadable file, make a new one
            }

            if ($cert) {
                Write-Host "Reusing certificate $($cert.Thumbprint) from $cerPath"
            }
            else {
                Write-Host "Creating certificate CN=$appName..."
                $rsa = [System.Security.Cryptography.RSA]::Create(2048)
                $request = [System.Security.Cryptography.X509Certificates.CertificateRequest]::new(
                    "CN=$appName", $rsa,
                    [System.Security.Cryptography.HashAlgorithmName]::SHA256,
                    [System.Security.Cryptography.RSASignaturePadding]::Pkcs1)

                $cert = $request.CreateSelfSigned(
                    [DateTimeOffset]::UtcNow.AddMinutes(-10),
                    [DateTimeOffset]::UtcNow.AddYears($certYears))

                # Private key file, protected with a random password
                $chars = "abcdefghijkmnopqrstuvwxyzABCDEFGHJKLMNPQRSTUVWXYZ23456789"
                $pfxPassword = -join (1..24 | ForEach-Object { $chars[(Get-Random -Maximum $chars.Length)] })
                $pfxBytes = $cert.Export([System.Security.Cryptography.X509Certificates.X509ContentType]::Pfx, $pfxPassword)
                [IO.File]::WriteAllBytes($pfxPath, $pfxBytes)

                # Public key file, the format the CLI uploads
                $base64 = [Convert]::ToBase64String($cert.RawData, "InsertLineBreaks")
                Set-Content $cerPath "-----BEGIN CERTIFICATE-----`r`n$base64`r`n-----END CERTIFICATE-----" -Encoding Ascii

                Write-Host "Saved $cerPath and $pfxPath"
            }

            # Entra ID lists certificates by thumbprint, base64 encoded
            $thumbprint64 = [Convert]::ToBase64String($cert.GetCertHash())
            $onApp = az ad app show --id $appId --query "keyCredentials[].customKeyIdentifier" -o tsv --only-show-errors

            if (($onApp -split "\s+") -contains $thumbprint64) {
                Write-Host "Certificate is already on the app registration."
            }
            else {
                Write-Host "Uploading the certificate..."
                $endDate = $cert.NotAfter.ToUniversalTime().ToString("yyyy-MM-ddTHH:mm:ssZ")
                az ad app credential reset --id $appId --append --cert "@$cerPath" --display-name "$appName-cert" --end-date $endDate -o none --only-show-errors
                if ($LASTEXITCODE -ne 0) { throw "Certificate upload failed." }
            }
        }
        else {
            Write-Host "Generating client secret..."
            $clientSecret = az ad app credential reset --id $appId --append --display-name "$appName-secret" --query password -o tsv --only-show-errors
            if ($LASTEXITCODE -ne 0) { throw "Client secret creation failed." }
        }


        # ----- 7. Admin consent ------------------------------------------------

        Start-Sleep -Seconds 10   # a new app needs a few seconds before consent works

        Write-Host "Granting admin consent (needs a Global Admin)..."
        az ad app permission admin-consent --id $appId --only-show-errors

        if ($LASTEXITCODE -eq 0) {
            $consentNote = "granted"
        }
        else {
            Write-Warning "Admin consent failed."
            if ((Read-Host "Sign in as a Global Admin now and retry? (Y/N)") -match "^[Yy]") {
                az login --use-device-code --only-show-errors | Out-Null
                if ($LASTEXITCODE -eq 0) {
                    az ad app permission admin-consent --id $appId --only-show-errors
                    if ($LASTEXITCODE -eq 0) { $consentNote = "granted" }
                }
            }
        }
        if ($consentNote -ne "granted") { Write-Warning "Grant admin consent manually in the Azure Portal." }


        # ----- 8. Directory roles (Teams Reader) -------------------------------

        if (-not $teamsReader) { Write-Host "Teams Reader role is switched off, skipping it." }

        foreach ($roleName in $directoryRoles.Keys) {
            $templateId = $directoryRoles[$roleName]
            Write-Host "Assigning directory role $roleName..."

            try {
                # A role must be activated in the tenant before it can have members
                $roles = Invoke-Graph GET "https://graph.microsoft.com/v1.0/directoryRoles"
                $role = $roles.value | Where-Object { $_.roleTemplateId -eq $templateId }

                if (-not $role) {
                    Write-Host "  activating the role in this tenant first"
                    $role = Invoke-Graph POST "https://graph.microsoft.com/v1.0/directoryRoles" @{ roleTemplateId = $templateId }
                }

                $members = Invoke-Graph GET "https://graph.microsoft.com/v1.0/directoryRoles/$($role.id)/members"

                if ($members.value.id -contains $spId) {
                    Write-Host "  already assigned"
                    $roleNotes += "$roleName (already assigned)"
                }
                else {
                    Invoke-Graph POST "https://graph.microsoft.com/v1.0/directoryRoles/$($role.id)/members/`$ref" `
                        @{ "@odata.id" = "https://graph.microsoft.com/v1.0/directoryObjects/$spId" } | Out-Null
                    Write-Host "  assigned"
                    $roleNotes += $roleName
                }
            }
            catch {
                Write-Warning "Could not assign $roleName. $($_.Exception.Message)"
                Write-Warning "The error above from az shows why. Assigning a role needs Privileged Role Administrator or Global Administrator."
                $roleNotes += "$roleName FAILED"
            }
        }


        # ----- 9. Reader on the subscriptions ----------------------------------

        if ($assignSubscriptionReader) {
            $subsJson = az account list --all --query "[?state=='Enabled'].{id:id,name:name}" -o json --only-show-errors
            $subs = if ($LASTEXITCODE -eq 0 -and $subsJson) { @($subsJson | ConvertFrom-Json) } else { @() }

            # Anything other than the empty GUID means "only this subscription"
            if ($subId -and $subId -ne "00000000-0000-0000-0000-000000000000") {
                $subs = @($subs | Where-Object { $_.id -eq $subId })
                if ($subs.Count -eq 0) {
                    Write-Warning "Subscription $subId was not found on the signed-in account."
                    $subNotes += "$subId NOT FOUND"
                }
            }
            elseif ($subs.Count -eq 0) {
                Write-Warning "No subscriptions visible to the signed-in account."
            }

            foreach ($sub in $subs) {
                $scope = "/subscriptions/$($sub.id)"

                $existing = az role assignment list --assignee $spId --role Reader --scope $scope --query "[0].id" -o tsv --only-show-errors
                if ($existing) {
                    Write-Host "Reader already assigned on $($sub.name)"
                    $subNotes += "$($sub.name) (already assigned)"
                    continue
                }

                Write-Host "Assigning Reader on $($sub.name)..."
                az role assignment create --assignee-object-id $spId --assignee-principal-type ServicePrincipal --role Reader --scope $scope -o none --only-show-errors
                if ($LASTEXITCODE -eq 0) {
                    $subNotes += $sub.name
                }
                else {
                    Write-Warning "Reader assignment failed on $($sub.name)"
                    $subNotes += "$($sub.name) FAILED"
                }
            }
        }

    }
    catch {
        Write-Host ""
        Write-Host "ERROR: $($_.Exception.Message)" -ForegroundColor Red
        $failed = $true
    }


    # ============================= Summary =====================================
    # Printed even after an error, so a credential that was already created is
    # never lost.

    if ($appId) {
        Write-Host ""
        Write-Host "==================== $appName ===================="
        Write-Host "Tenant ID   : $tenantId"
        Write-Host "App ID      : $appId"
        Write-Host "Object ID   : $spId"

        if ($useCertificate -and $cert) {
            Write-Host "Auth        : certificate"
            Write-Host "Thumbprint  : $($cert.Thumbprint)"
            Write-Host "Expires     : $($cert.NotAfter.ToString('yyyy-MM-dd'))"
            Write-Host "Public key  : $cerPath"
            Write-Host "Private key : $pfxPath"
            if ($pfxPassword) { Write-Host "PFX password: $pfxPassword" }
        }
        if ($clientSecret) {
            Write-Host "Auth        : client secret"
            Write-Host "Secret      : $clientSecret"
        }

        $roleText = if ($roleNotes) { $roleNotes -join ", " } else { "none" }
        $subText = if ($subNotes) { $subNotes -join ", " } else { "none" }

        Write-Host "Consent     : $consentNote"
        Write-Host "Dir roles   : $roleText"
        Write-Host "Reader on   : $subText"
        Write-Host "=========================================================="

        if ($pfxPassword) { Write-Host "Save the PFX password now, it is not stored anywhere." }
        if ($clientSecret) { Write-Host "Save the client secret now, it cannot be shown again." }
    }

    if ($failed) {
        Write-Host ""
        Write-Host "Setup did not finish. Fix the error above and run the script again." -ForegroundColor Red
    }

    if ($pauseWhenDone -and [Environment]::UserInteractive) {
        Read-Host "Press Enter to close"
    }

    # "exit" closes the whole PowerShell session when this file is dot-sourced or
    # piped into Invoke-Expression, so only use it for a normal script run.
    if ($MyInvocation.MyCommand.CommandType -eq "ExternalScript" -and $MyInvocation.InvocationName -ne ".") {
        if ($failed) { exit 1 } else { exit 0 }
    }

```

* [ ] Upload file to powershell
*

<figure><img src="https://3408039743-files.gitbook.io/~/files/v0/b/gitbook-x-prod.appspot.com/o/spaces%2FObpV44hoVkNmo5bFuVVL%2Fuploads%2Fgit-blob-22044ff60719cabf00fbd425b807e01b1faff6df%2Fupload_ps_create_app_script_azure_web_shell.PNG?alt=media" alt=""><figcaption></figcaption></figure>

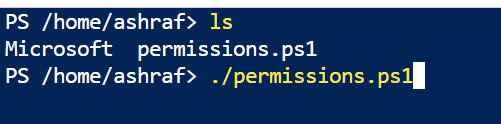
* [ ] After uploading the file, run it via console `./permissions.ps1`

<figure><img src="https://3408039743-files.gitbook.io/~/files/v0/b/gitbook-x-prod.appspot.com/o/spaces%2FObpV44hoVkNmo5bFuVVL%2Fuploads%2Fgit-blob-b982037609a8500674d0895d693df3891f39bca5%2Frun-script.PNG?alt=media" alt=""><figcaption></figcaption></figure>

#### Notes:

* You can find your App ID in **App registrations** > \[Your App] > **Overview**.
* By default a certificate is being generated to be used for authentication
* It's possible to use a client secret changing the script variable UseCert to $false
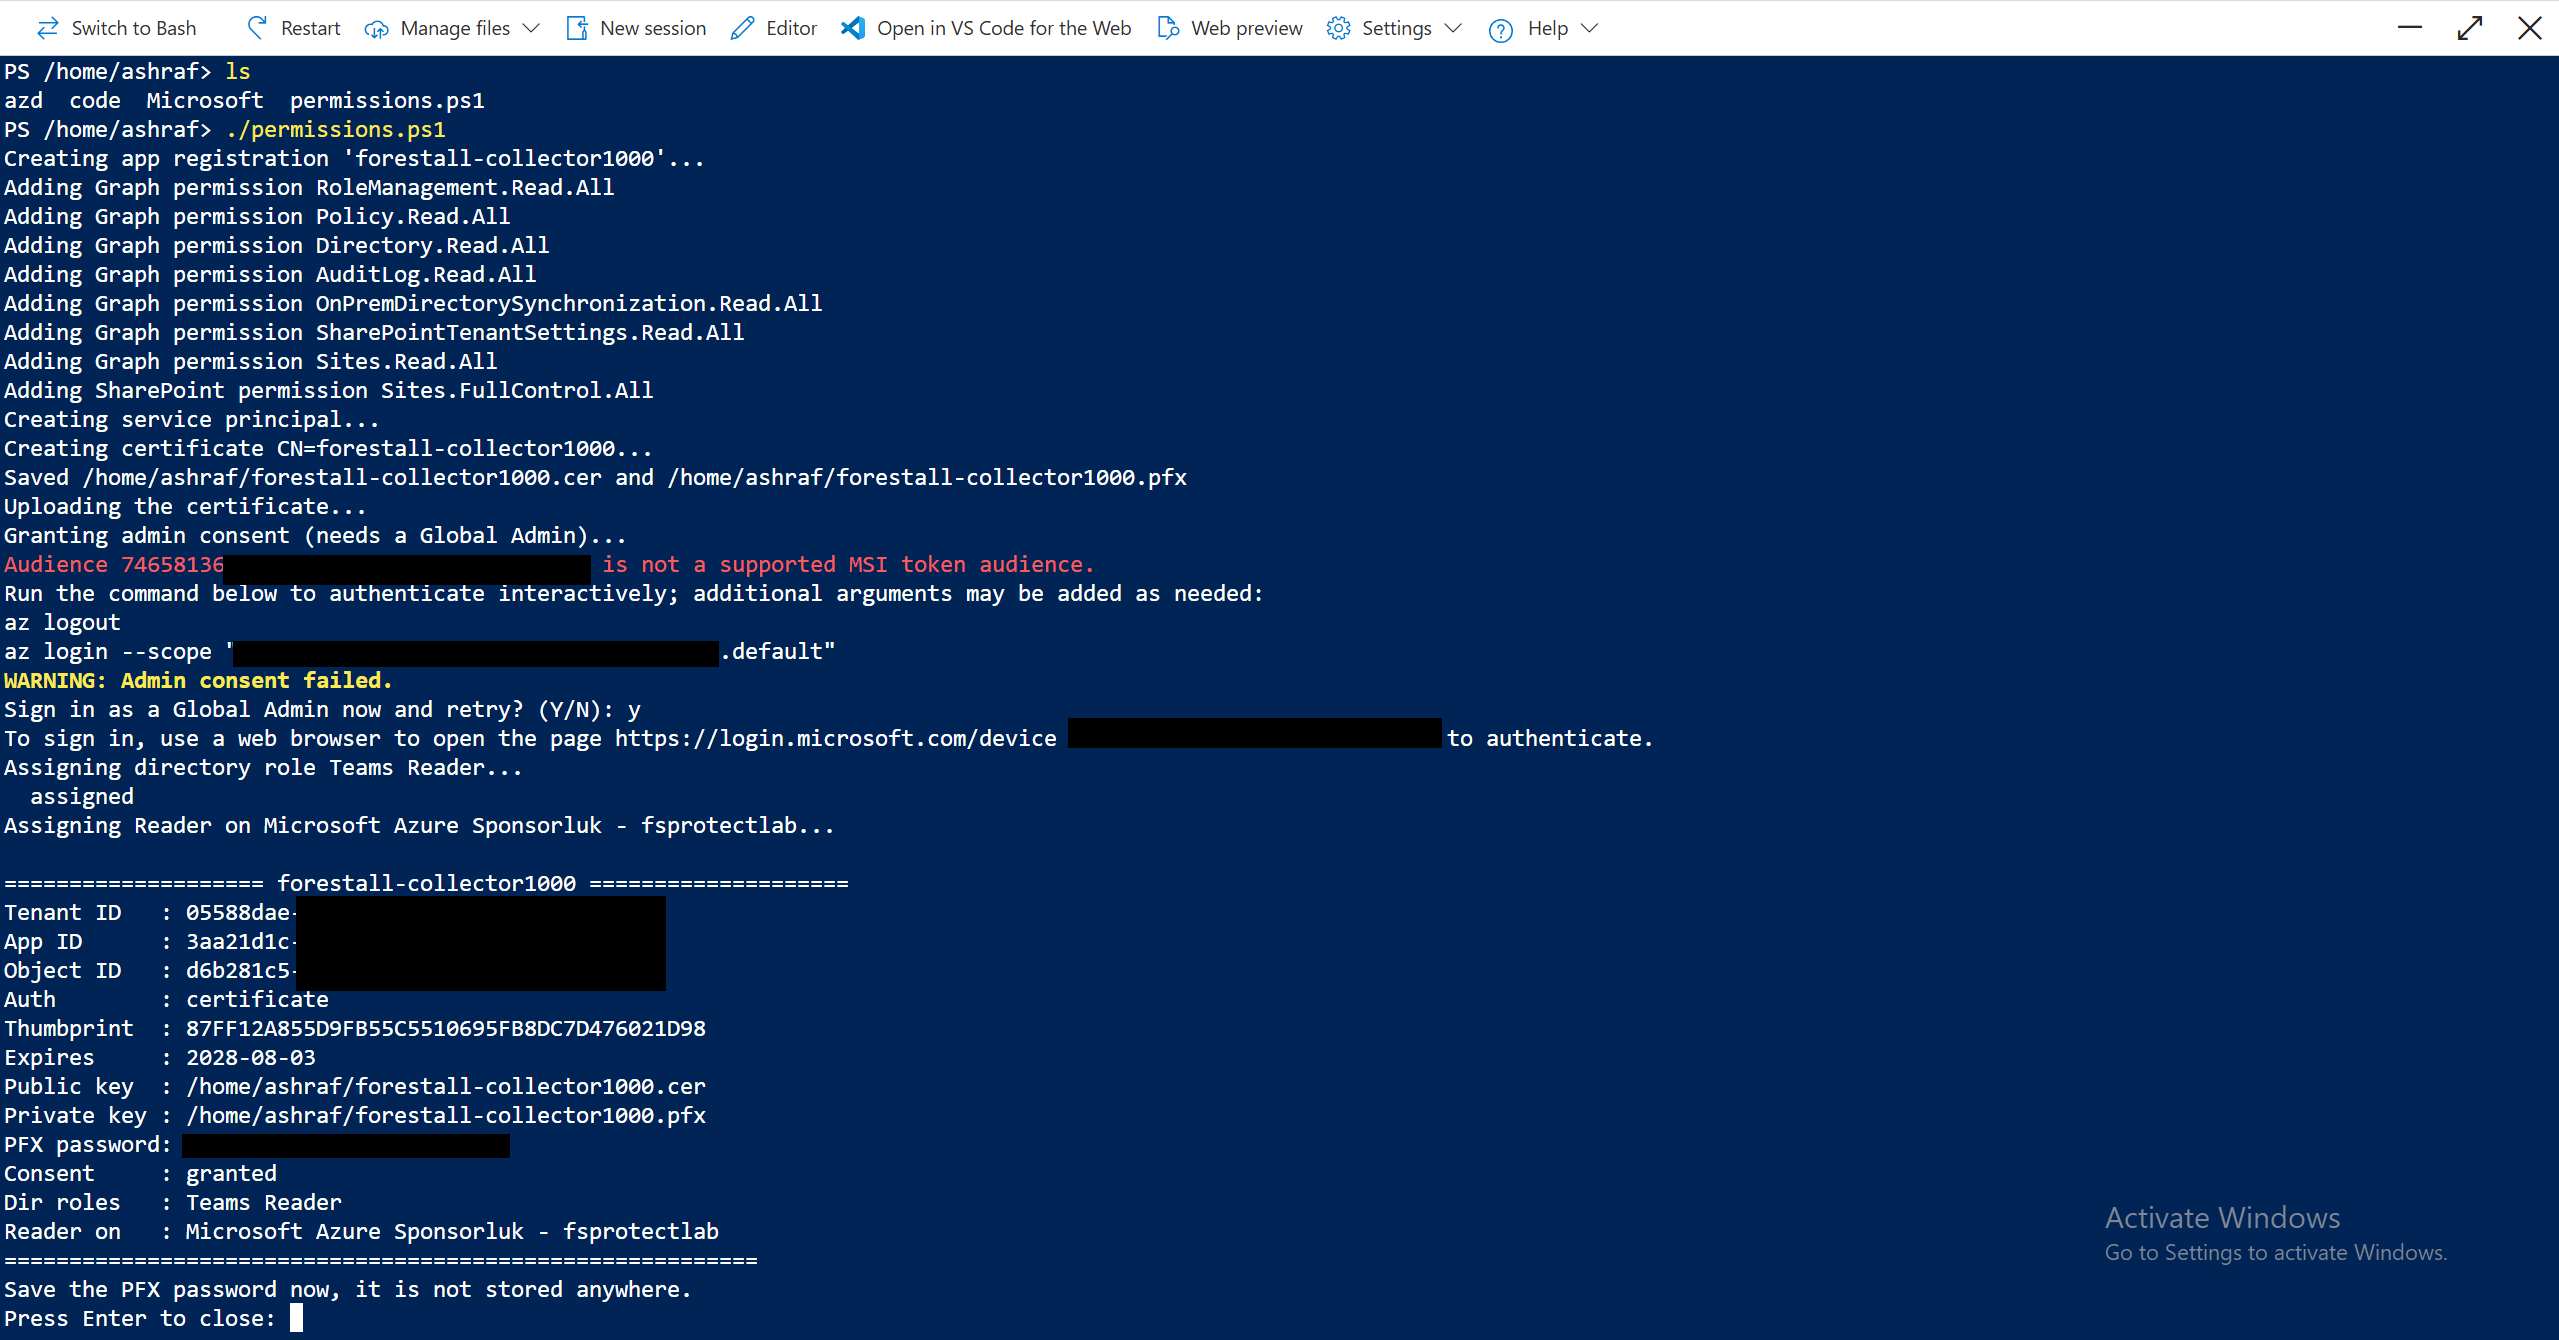
* After creating the app and assigning the permissions via script download the certificate and save the certificate password

<div align="right"><figure><img src="https://3408039743-files.gitbook.io/~/files/v0/b/gitbook-x-prod.appspot.com/o/spaces%2FObpV44hoVkNmo5bFuVVL%2Fuploads%2Fgit-blob-708f7e45a20bdab12f40b1bb27ad00d9f07f0a30%2Fcreate_app_script.PNG?alt=media" alt=""><figcaption><p>Application Certificate Password</p></figcaption></figure></div>

* If a secret is used instead you need to copy **Secret Value**.

<figure><img src="https://3408039743-files.gitbook.io/~/files/v0/b/gitbook-x-prod.appspot.com/o/spaces%2FObpV44hoVkNmo5bFuVVL%2Fuploads%2Fgit-blob-b85be8d1d7be679a01dd35846004352172863a63%2Fclient_secret_app_creation.PNG?alt=media" alt=""><figcaption><p>Client Secret needs to copy</p></figcaption></figure>

* If using script without **global admin account, admin consent** still needs to be granted manually in the portal (go to optional step 2).

### (Optional Step 2): Grant Admin Consent via Portal (if using script)

1. Go back to **App registrations** > \[Your App] > **API permissions**.
2. Click **Grant admin consent** to activate the permissions.
3. Teams Reader Role must be assigned manually. Please check [#what-is-teams-reader-role](#what-is-teams-reader-role "mention")

## Step 3: Azure Configuration in Forestall ISPM

This section allows you to configure Azure Active Directory (Azure AD) authentication and permissions for the application. Use this configuration to grant or revoke access to Azure resources and services.

<figure><img src="https://3408039743-files.gitbook.io/~/files/v0/b/gitbook-x-prod.appspot.com/o/spaces%2FObpV44hoVkNmo5bFuVVL%2Fuploads%2Fgit-blob-f51bb56fe033325edcc200b33f25870f688220cc%2FAzure-Configuration-in-FSProtect.png?alt=media" alt=""><figcaption></figcaption></figure>

### Configuration Fields

#### Region

Specifies the Azure environment where your application is deployed. Options typically include:

* **Cloud** - Azure Public Cloud (standard commercial cloud)
* **Government** - Azure Government Cloud (for US government agencies)
* **China** - Azure China Cloud (operated by 21Vianet)

#### Directory (Tenant) ID

**Format:** UUID (e.g., `05588dae-2a80-4f4d-...`)

Your Azure AD tenant identifier. This is a unique GUID that identifies your organization's Azure Active Directory instance. You can find this in the Azure Portal under `Azure Active Directory` > `Overview` > `Tenant ID`.

#### Application (Client) ID

**Format:** UUID (e.g., `07122f25-82ff-496d-...`)

The unique identifier for your registered application in Azure AD. This is generated when you register an application in Azure Portal under App Registrations. This ID is used to identify your application when requesting authentication tokens.

#### Password Writeback Enabled

Determines whether password changes in Azure AD has written back to your on-premises Active Directory. Options:

* **Enabled** - Password changes sync back to on-premises AD
* **Disabled** - Password changes remain only in Azure AD
* **Not Defined** - Feature is not configured

#### Authentication Method

Specifies how your application authenticates with Azure AD. Common methods include:

* **Client Secret** - Uses a client secret for authentication
* **Certificate (recommended)** - Uses a certificate for authentication

#### Client Secret

The secret key used to authenticate your application with Azure AD. This value should be:

* Kept secure and never exposed in code or logs
* Rotated regularly according to your security policy
* Obtained from Azure Portal under `App Registrations` > `Certificates & secrets`

#### Tenant Display Name

A friendly name for your Azure AD tenant. This is typically your organization's name and helps identify the tenant in multi-tenant scenarios.

#### App Display Name

The display name of your registered application in Azure AD. This name appears in consent prompts and admin portals to help identify your application.

### Actions

#### Test

Validates the Azure configuration by attempting to authenticate and verify permissions. Use this to ensure your configuration is correct before saving.

#### Save

Saves the current configuration settings to application. All fields must be properly configured before saving.

#### Delete

Removes the Azure configuration from application. Use with caution as this will disable Azure AD integration.

### Best Practices

1. **Least Privilege Principle** - Only grant the minimum permissions required for application to function
2. **Secret Rotation** - Regularly rotate client secrets (recommended every 90 days or per your security policy)
3. **Permission Review** - Periodically review granted permissions and remove any that are no longer needed
4. **Testing** - Always use the "Test" button to validate configuration before saving changes

### Troubleshooting

**Authentication Fails**

* Verify the Client ID and Client Secret are correct
* Ensure the secret hasn't expired
* Check that the application is registered in the correct tenant

**Permission Denied Errors**

* Confirm all required permissions are granted
* Verify an admin has consented to the permissions
* Check that users have appropriate licenses in Azure AD

**Configuration Won't Save**

* Ensure all required fields are filled
* Verify the Tenant ID and Client ID formats are valid UUIDs
* Check that the Test passes successfully before saving

## Required Microsoft Azure Permissions for Integration <a href="#integration" id="integration"></a>

To ensure secure and comprehensive functionality between your systems and Microsoft Azure (Azure Active Directory), the following permissions are required:

### **1. Directory.Read.All**

**What it does:**\
Grants read-only access to all directory objects in Microsoft Azure, including users, groups, devices, and administrative units.

**Why it's needed:**\
This permission allows the integration to retrieve essential identity data, enabling user mapping, group membership evaluation, and device information access for reporting or policy decisions.

***

### **2. AuditLog.Read.All**

**What it does:**\
Provides read access to the directory’s audit logs, which record configuration changes and administrative actions across the tenant.

**Why it's needed:**\
Required to track configuration changes and user activity for auditing, compliance, and forensic analysis within the integration.

***

### **3. Policy.Read.All**

**What it does:**\
Allows the application to read conditional access policies, authentication policies, and other security-related configurations.

**Why it's needed:**\
Essential for understanding and visualizing how security policies are configured across the tenant, helping administrators identify risks or configuration issues.

***

### **4. RoleManagement.Read.All**

**What it does:**\
Grants read-only access to directory roles, role assignments, and role eligibility settings.

**Why it's needed:**\
Enables the integration to provide visibility into privileged roles, who holds them, and how administrative permissions are structured—critical for role governance and least-privilege assessments.

***

### **5. OnPremDirectorySynchronization.Read.All**

**What it does:**\
Allows reading of the on-premises directory synchronization configuration and related metadata.

**Why it's needed:**\
Required to understand hybrid identity configurations, sync status, and directory health—ensuring that on-prem AD and Azure are working in harmony and fully visible to administrators.

## Optional Microsoft Azure Permissions for Enhanced Functionality

These permissions enhance functionality but are not required for basic operation. Grant these based on your application's specific needs and use cases.

### 1. Teams Readers Role

**What it does:**

Grants read-only access to Microsoft Teams administration data and settings, including team configurations, user assignments, policies, and administrative information without the ability to make any changes.

**Why it's needed:**

Required when users or applications need to view Teams administrative settings for monitoring, reporting, compliance audits, or troubleshooting purposes without risking accidental modifications to the Teams environment.

### 2. Reader

**What it does:**

Grants read-only access to all Azure Resource Manager (ARM) resources and their configurations, including virtual machines, storage accounts, networking components, resource groups, subscriptions, and other infrastructure objects without the ability to make any changes.

**Why it's needed:**

Required when users or applications need to scan, inventory, and assess Azure infrastructure for security monitoring, compliance reporting, resource audits, or configuration analysis purposes without risking accidental modifications to the Azure environment.

### 3. SharePointTenantSettings.Read.All

**What it does:**

Provides read access to SharePoint tenant-level settings, including external sharing policies, site creation settings, and tenant-wide configurations.

**Why it's needed:**

Essential for understanding the global SharePoint configuration across your organization, helping administrators audit tenant settings, identify security risks, or ensure compliance with organizational policies.

### 4. Sites.Read.All

**What it does:**

Enables the application to read SharePoint site collections, lists, libraries, and their content across the entire organization without user delegation.

**Why it's needed:**

Required when your integration needs to analyze SharePoint content, generate reports on site usage, perform content audits, or provide visibility into document repositories for compliance purposes.

### 5. Sharepoint.Sites.FullControl.All

**What it does:**

Provides full control over all SharePoint sites, allowing the application to create, read, update, and delete sites, site collections, lists, libraries, and their content.

**Why it's needed:**

Necessary for integrations that actively manage SharePoint environments—such as automated site provisioning, content migration tools, backup solutions, or applications that modify site structures and permissions on behalf of administrators.

**⚠️ Security Note:** This is a highly privileged permission that grants extensive control over SharePoint data. Only grant this permission if your application absolutely requires write/modify capabilities, and ensure proper governance and monitoring are in place.